Now Streaming On US Sports Radio!

US Sports Net Today!


Live Play-by-Play, Updates, Highlights and More! on US Sports Network!
[Chrome Users-You may have to click on the play button twice to listen]
US Sports Network Powered By Gorilla Sports!


US Sports Radio
The Las Vegas Raiders Play Here
Fitness and Sports Performance Info You Can Use!
The Scoreboard Mall
The Rock Almighty Shaker Of Heaven And Earth!
The Coolest Links In The Universe!

Tuesday, April 29, 2025

US Sports Soccer: How to Structure Practice Sessions: A Complete Guide for Youth Soccer Coaches and San Jose Earthquakes vs. Sporting Kansas City Highlights 8-Goal Madness!

 Torpedo Bats (and the player who wield them) Continue To Dominate MLB. Now Streaming On US Sports Radio.

  • By Chaz

Great practices don’t happen by accident—they’re the result of thoughtful planning, clear objectives, and an understanding of how players develop over time.

As a youth soccer coach, your job is to create an environment where players can improve technically, grow in confidence, and have fun. Structuring your training sessions with a proven framework ensures you're meeting your players where they are developmentally and helping them build up their skills progressively.

Why Practice Structure Matters

The best youth soccer sessions follow a logical progression—from learning a technique, to applying it under pressure, to executing it in a game-like setting. This structure mirrors how players naturally learn and adapt. When practice is organized with intention, players are more engaged, better prepared for game situations, and ultimately, more successful.

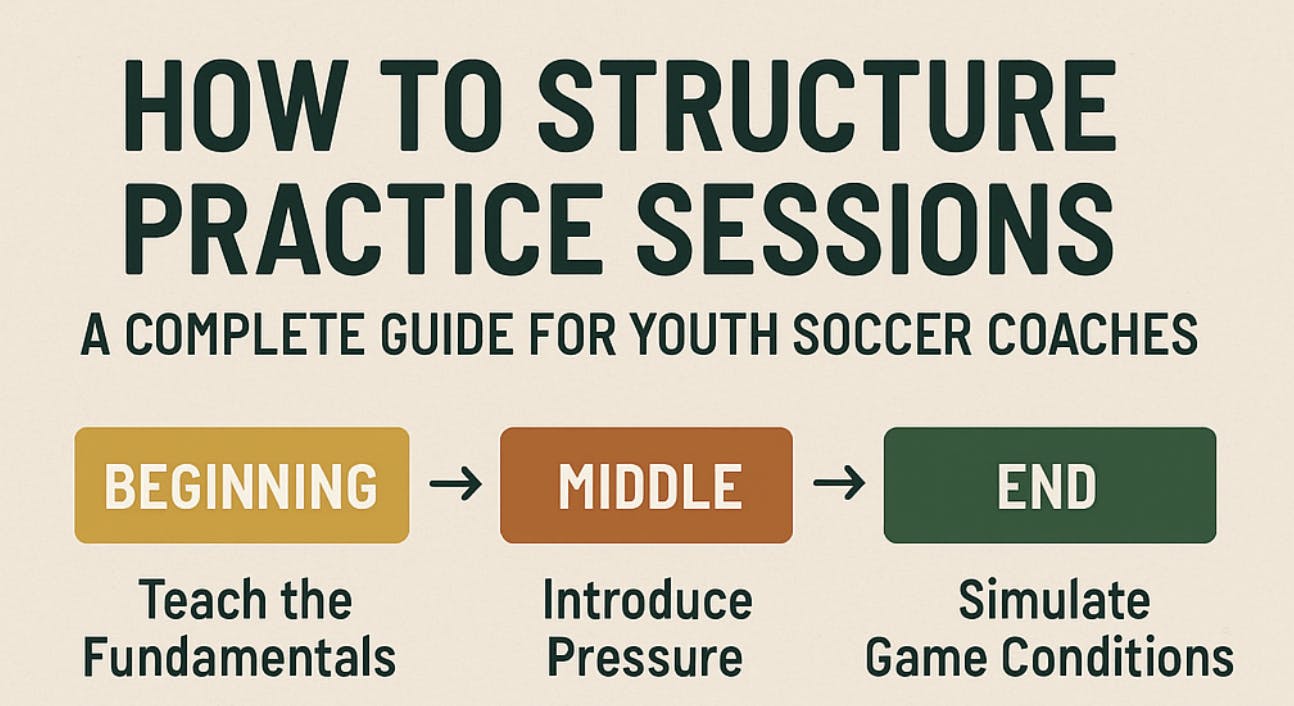
The 3-Part Practice Framework

Let’s break down a typical session into three phases: Beginning (Individual Technique), Middle (Small-Sided Pressure), and End (Game Conditions). This model gives you the flexibility to focus on different skills while creating consistency and flow in your coaching style.

1. Beginning: Teach the Fundamentals (Individual Work)

This is where players are introduced to the technical focus of the session—whether it’s passing, dribbling, shooting, or defending. There should be no defensive pressure, allowing players to gain confidence and proper technique at their own pace.

Introduce the concept or skill with a clear demo.

Have players perform the skill individually.

Set individual targets (e.g., 10 successful passes with both feet).

Progress to performing the technique at game speed.

By the end of this phase, every player should understand what the skill looks like and feel comfortable executing it in a controlled environment.

2. Middle: Introduce Pressure (Game-Related Skills)

Now it’s time to challenge players by adding a layer of passive or active pressure. Think 1v1, 2v2, or 3v3 scenarios where players must apply the skill in a competitive setting. This builds decision-making and reinforces the technique in more realistic conditions.

Start with passive pressure (defenders give light resistance).

Gradually increase to full pressure (defenders try to win the ball).

Encourage creativity, quick decision-making, and spatial awareness.

Rotate roles so every player experiences offense and defense.

This phase transitions the skill from isolated practice to situational awareness and reaction—critical for real-game success.

3. End: Simulate Game Conditions

The final portion of practice should look and feel like the actual game. Use small-sided games (e.g., 4v4, 5v5) with coaching conditions that reinforce your technical focus. This allows players to apply what they’ve learned in an open environment.

Use short-sided or odd-numbered games to increase touches and decisions.

Add specific rules to emphasize your focus skill (e.g., 2-touch max, must complete 3 passes before shooting).

Encourage communication and team play.

Give players feedback, but let the game teach too.

Game-like drills bring intensity, excitement, and real pressure to your session. This is also the phase where fun and competition can truly shine.

Free Practice Session Planning Template

Use this simple template to prepare every session with confidence and structure:

Warm-Up (10 mins) Objective: Get players moving, increase heart rate, light technical work Examples: Dynamic stretches, dribbling relays, rondo keep-away

Beginning Phase (15–20 mins) Objective: Introduce technical focus in isolation Examples: Passing pairs, cone dribbles, shooting on open net

Middle Phase (20 mins) Objective: Apply technique under pressure Examples: 1v1 challenges, 2v2 games, transition drills

End Phase (20 mins) Objective: Simulate game conditions with constraints Examples: 4v4 games, small-sided scrimmages with touch/pass rules

Cool Down & Recap (5 mins) Objective: Stretch, reflect, give feedback Examples: Static stretching, quick Q&A, positive reinforcement

Final Thoughts

There’s no single “right” way to coach—but having a clear, structured approach to every practice will elevate your players’ development and make your job as a coach more rewarding. Build your sessions around a purpose, adapt to your group’s needs, and never forget to keep it fun.

Remember: when players are learning and enjoying the game, everyone wins.

Further Learning

For coaches working with players ages 10 and up, Nick Harrison offers a valuable course on CoachTube that expands on the ideas shared here. It covers session planning, skill development, and age-specific coaching strategies.

Explore the course here: Coaching Youth Soccer: Ages 10 and Up and Up

Thanks to Nick Harrison for sharing his insights and helping coaches continue to grow.

NYSS Stay In The Game
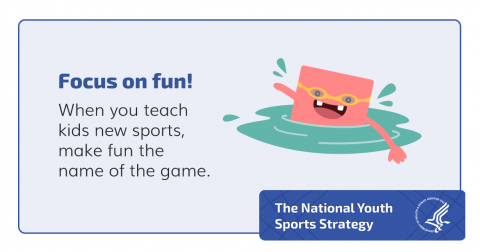
Want to help kids stick with sports? Prioritize fun and
 #PhysicalActivity over competition in #YouthSports programs. Learn more
 in @HealthGov’s National Youth Sports Strategy: https://bit.ly/2lQ85f6

Monday, April 28, 2025

US Sports Track and Field: Two Points of Focus When Coaching and Training Hurdles and Karsten Warholm Sets 300m Hurdles WORLD RECORD 2025 Diamond League


  • By Grant Young

Pinpointing and diagnosing mechanical issues in athletes can be particularly challenging for hurdle training due to several factors: 

1. Complexity of Technique: Hurdling requires a unique blend of speed, timing, and coordination, with the need to clear hurdles efficiently while maintaining forward motion. This complexity means that even small mechanical errors can have a cascading effect on an athlete's performance. Coaches must be adept at identifying these subtle errors, which can be tough given the fast-paced nature of the event. 

2. Variability Among Athletes: Each athlete presents a unique set of physical attributes, including height, stride length, and strength. These differences can influence hurdle technique, making it difficult for coaches to apply a one-size-fits-all approach. What may work for one athlete could lead to problems for another, complicating the identification of issues. 

3. Perceptual Challenges: Athletes often perceive their own performance differently than coaches observe it. An athlete may feel they are executing a technique correctly, while a coach may see noticeable flaws. This disconnect can lead to miscommunication, making it harder for coaches to accurately diagnose and correct mechanical issues. 

4. Subtlety of Errors: Many mechanical issues manifest in subtle ways that aren’t immediately obvious. For instance, slight misalignments in foot placement or body angles may not be detected without close observation or video analysis. Coaches need to be thorough in their assessments and often require advanced technology to catch these nuances. 

Because of these many factors, it’s important that coaches know what to look for when assessing mechanical mishaps their athletes may be dealing with during their hurdles. This is why we’ve pulled two points of focus when training hurdles from two elite hurdles coaches that you can keep an eye on next time you’re trying to decipher why your athletes aren’t setting their personal bests. 

Kenny Anderson - Training Focus

Kenny Anderson enters his fifth season as the Director of Track & Field/Cross Country at Central Methodist in 2024-25.

The 2022-23 season was a stellar year for Anderson and the Eagles, as 13 school records and one conference record were broken. The CMU Women won their second-straight Heart Indoor Conference Championship, which included five individual conference titles. As a result, Anderson was named both the Heart Conference and the USTFCCCA South Central Region Women’s Indoor Coach of the Year. Altogether, the Eagles garnered nine NAIA All-American selections, the most at a single national meet in program history.

In his ‘Difference in Focus between 100 Hurdles & 110 Hurdles’ clinic, Coach Anderson addresses a few points of emphasis when it comes to training your hurdle athletes.

One of his most crucial points in the clinic is that all training exercises and drills should be focused on producing the fastest time possible. Since that’s always the goal when competing, it should also always be the goal when competing. 

Going off of this, training and drills should emphasize the rhythm of hurdles. According to Coach Anderson, rhythm for a hurdler is the type of speed that allows hurdlers to use their techniques to the maximum. 

When emphasizing rhythm in drills, Coach Anderson likes to use seven, nine, or 12 hurdles, because he thinks that’s the sweet spot to establishing rhythm without doing too much to tire your athletes out. 

Patience is imperative when it comes to training hurdle athletes. If you’re executing perfect practice plans, utilizing drills that emphasize rhythm, and diagnosing all of your athlete’s mechanical flaws as soon as they occur, it would still be illogical to assume you’ll see tangible changes from your athletes’ times before six weeks. Coach Anderson says that usually, around six to seven weeks, he begins to see changes in his athletes’ times from the start of the season. 

Jamie West -  Common Technical Issue #1 - Take Off Spot

null

Jamie West has been a track and field coach for 15+ years. Coach West hurdled at Davis High School and went on to hurdle at D1 Weber State University. Coach West was a 2-time state champion in the 100m hurdles. 

Jamie West has enjoyed coaching hurdlers from all over the State of Utah as well as some hurdlers nationally and internationally. 

In her ‘Hurdle Drills, Technique, and Corrections’ clinic, Coach West discusses the most common technical issue she sees during the take-off phase and addresses how a coach can fix it.

To her, the most common technical issue at this phase is the athlete taking off too close to the hurdle. Some other common ones are if the hurdler isn’t aligned when they’re coming into their leap, with a third one being the athlete either not planting or dropping their hips when they enter the take off. 

When the athlete is jumping too close to the hurdle, the body will likely compensate by pulling backward, the body’s momentum will go upward, and the lead leg might have to be shifted somewhere off-center. All of these will slow the runner down considerably. 

Coach West also wants to make sure coaches are entering their take off on their heel, planting firmly, rather than on the ball of their foot. This is because all of that momentum that’s going into the ground with the heel is going to propel the athlete when they commence their take off.

NYSS Find Their Strengths
 Sports help kids build confidence and grow into 
healthy, active adults. Learn how organizations, communities, and 
policymakers can use @HealthGov’s National #YouthSports Strategy to 
support youth sports: https://bit.ly/2lQ85f6


Sunday, April 27, 2025

The Rock Almighty: The Centrality of the Lamb of God and Yep He Loves You Anyhow!


  • Author St. Thomas Church

“Faith is not a once-done act, but a continuous gaze of the heart at the Triune God. It is lifting the mind to ‘behold the Lamb of God,’ and never ceasing that beholding for the rest of our lives.” - A.W. Tozer

“And between the throne and the four living creatures and among the elders I saw a Lamb standing, as though it had been slain.”

As believers on earth we will soon experience heaven. Our days are numbered and short. If one lives to 70 years old we would have only 3652 Sunday’s to worship, a mere 25,567 days in our total lifetime. Heaven is surely close to all of us. Many people have strange ideas of what to expect in heaven or see once they arrive there, yet the Holy Scriptures are very clear, showing us that there is ongoing worship in heaven even as you read this book now.

In, Revelation 5, we have one of the best views into the heavenly scene where all focus is solely on a Lamb. This Lamb is the very Son of God who was incarnated for mankind, and His wounds are still visible. Historically, in Church stained glass windows, there is a picture of an Agnus Dei Lamb holding a banner (symbolizing victory), and there is a wound with blood pouring out into a chalice.

This beautiful image of a Lamb slain symbolizes God’s victory and triumph over sin and death. It was through weakness and what appeared to be a defeat that God conquered. A wounded Lamb is a Victor! When we are weak, we are strong. The weakness of God is greater than man’s strength. By His wounds, we are healed.

Heaven’s focal point, therefore, is God displaying the wonder of the Gospel afresh and vividly through his atonement and sacrifice on the Cross. We will marvel and worship from generation to generation in endless eternity, lauding the Holy Trinity for His endless love and lowly condensation for men.

In early liturgies, this phrase is repeated three times during the Eucharist service: “O Lamb of God, that takes away the sin of the world, have mercy upon us.”

Jesus is the Focus of Heaven

God the Father has purposed that Jesus should be glorified in all things. All focus and attention are on the Son of God. The Scripture says, “Every knee should bow, in heaven and on earth and under the earth, and every tongue confess that Jesus Christ is Lord.” Jesus created the earth and all the things we see. He will come and judge the earth also, at the very end.

As we state in the historic Nicene Creed, “We look for the resurrection of the dead, and the life of the world to come.” All matter is held together by the power of Jesus Christ, the Son of God. Without Him, literally, everything falls apart. Jesus’ name is above every other name. He is the King above all other kings. Jesus is the Supreme Teacher. He is the very Wisdom of God. He is the uncreated Word of God (the Logos).

Jesus of Nazareth is God in the Flesh. He was incarnated by the Holy Spirit in the womb of the Virgin Mary. By His life, we have life. He is the Eternal, unending Life. As an early creed of the Church proclaimed:

“He was manifested in the flesh,

vindicated by the Spirit,

seen by angels,

proclaimed among the nations,

believed on in the world,

taken up in glory."

The heavenly scene depicts Jesus in the center, on God’s right hand, with all attention focused on Him. Myriads of angels are worshipping. Seraphim and Cheribum are angels created by God who dwell near His presence more than others. Because of this, they have six wings; with two wings, they cover their eyes from God’s glory; with two other wings, they cover their feet; and with the last two, they fly.

It says in the Revelation account that they never cease to say: “Holy, holy, holy, is the Lord God Almighty, who was and is and is to come!” We also see the holy twelve Apostles, Patriarchs, and godly Saints all bowing down before the Lord.”

We read in Revelation 5:

“Then I saw a Lamb who appeared to have been slain, standing in the center of the throne, encircled by the four living creatures and the

elders. The Lamb had seven horns and seven eyes, which represent the seven Spirits of God sent out into all the earth. And He came and took the scroll from the right hand of the One seated on the throne.

When He had taken the scroll, the four living creatures and the twenty-four elders fell down before the Lamb. Each one had a harp, and they were holding golden bowls full of incense, which are the prayers of the saints. And they sang a new song:

‘Worthy are You to take the scroll and open its seals, because You were slain, and by Your blood You purchased for God those from every tribe and tongue and people and nation.

You have made them to be a kingdom and priests to serve our God, and they will reign upon the earth.’”

This standing Lamb is the center of heaven but also should be the center and focus of our worship gatherings and lives on earth.

St. Thomas Church is a Church planting movement that embodies older Christian practices and beliefs with modern expressions of worship. Our desire is to spread the Good News of Jesus everywhere, making disciples in the faith. Be involved with a move of God in community with others. God could be calling you to plant a Mission Church in your area.

Saturday, April 26, 2025

US Sports Tennis: Four Tips to Turn Your Tennis Forehand Into a Weapon and Novak Djokovic vs Matteo Arnaldi Match Highlights!

 Sanders To The Browns, And Higher Draft Pick News Now Streaming On US Sports Radio

  • By Grant Young

Every player acknowledges the tennis forehand as a fundamental shot, yet surprisingly few transform it into a genuine weapon. The secret? It doesn't require years of training—just a handful of focused adjustments can dramatically elevate your forehand from basic to devastating.

But before these game-changing tips, players must first understand the basics of a decent forehand. First, grip matters immensely. The slight rotation from an eastern to a semi-western grip allows for more topspin generation while maintaining control. This small adjustment creates heavier balls that push opponents back and open the court.

Footwork serves as the foundation. Positioning yourself with shoulders turned and weight loaded on your back foot creates potential energy. The simple act of stepping into your shot transfers this energy through the ball, instantly adding power without additional effort.

The follow-through often gets overlooked. Finishing high and across your body—what coaches call "closing the door"—ensures proper rotation and spin. This single adjustment can add depth and consistency overnight.

Contact point is critical. Meeting the ball slightly in front of your body and at the peak of its bounce maximizes control. This seemingly minor positioning change creates clean contact and prevents the common error of hitting behind yourself.

Finally, visualization transforms mechanics into muscle memory. Before each shot, picture the ball traveling deep and heavy into your target zone. This mental practice aligns your body mechanics with your intention.

The beauty of these adjustments lies in their simplicity. They don't require rebuilding your stroke—just refining existing mechanics. Within weeks of implementing these focused changes, your forehand can evolve from merely consistent to a genuine threat that opponents fear.

The forehand weapon you've always wanted isn't years away—it's waiting to be unleashed through deliberate attention to these fundamental elements. And while all of these tips will serve as a basis, the tips that USPTR Pro Performance Tennis Coach Jan Metelka details in his ‘Turn Your Forehand Into A Weapon: Effortless Tennis Forehand Blueprint’ clinic will teach you everything you need to know in order to turn your forehand into a weapon and start dominating in your tennis matches.

We have pulled four of Coach Metelka’s lessons and have included them below.


Stance & Balance

null

Coach Metelka explains that the player wants to keep their body weight forward while hitting the forehand.

And depending on whether you’re a left-handed or right-handed player, they will want to make sure their non-racket hand is dropping a bit lower than their racket hand when preparing to hit the forehand. This also requires the belly to go backward a bit while the hips tilt forward. 

When it’s time to hit the ball, the back hip should be the first thing to release from its coil, which will spring the rest of the body into motion and deliver energy and power through the ball. 

Coach Metelka also conveys that the big toe of the back leg should always be pointed straight at the fence opposite it, and not anywhere closer to the net. This will ensure that your hips don’t get blocked from a full rotation, which would limit power and output. 

Dealing With Higher Bouncing Balls

null

The mechanics involved with hitting the forehand of a higher bouncing ball are significantly different because of how the center of gravity shifts. Coach Metelka addresses this by saying that a player must stay on top of the ball, to the point where they will be hitting the ball while off the ground. 

Of course, this is going to mean that it’s more difficult to generate power with the forehand on a high ball. Coach Metelka solves this by advising that the player get into something of a squatted position while preparing to hit the ball, coiling their legs so that they can spring forward and upward when it’s time to actually hit the ball. 

When thinking of doing this, start by feeling yourself bending your knees and then springing upwards like a body weight squat (while remaining well balanced). 

Forehand Fitness Drills - Side Leg Squats

Speaking of squats, Coach Melelka also discusses some drills and exercises that are great for improving the forehand’s strength. One is what he calls a side leg squad, which will start with the player holding a medicine ball that’s approximately between 8 to 10 pounds, but this will depend on the player.

From there, the player will do a side squat to the left side while placing the medicine ball over their left thigh. And when that left leg comes up from this squat/lunge position, the medicine ball will create added weight and tension to work with. 

The athlete can either do consecutive reps on one leg (ideally 8 to 10) or alternate legs, making for about 20 reps total for each set. 

The player’s weight must remain in their thighs, hips, and rear rather than having too much pressure pile up on the knee. 

Forehand Fitness Drills - Attacking Forehand Practice On The Tennis Wall

null

Another drill that Coach Metelka discusses involves finding a wall that you can hit tennis balls repeatedly at.

With each hit, you will want to alternate how hard you’re hitting the ball so that it comes to you at different speeds. With each hit, you’ll want to ensure that your footwork is correct so that each hit is indeed a forehand. 

This is a great opportunity to practice all of the other mechanical tips you’ve learned to this point.

Friday, April 25, 2025

US Sports Lacrosse: Climbing the Coaching Ladder: Elite Training Camp and Halifax Thunderbirds vs Toronto Rock Highlights

 NFL Draft, NBA Playoffs and more now streaming on US Sports Radio

Climbing the Coaching Ladder: Elite Training Camp

Elite Training Camp for Coaching (ETC) is a coaching and career development. The first ETC was help in August 2017. Coach Eastman, a former NBA executive and assistant coach (LA Clippers and Boston Celtics), college head coach, college assistant coach, college athletic director and Nike skills academy director is the founder and main speaker. ETC was created to help coaches improve in their current positions and to prepare for their next opportunity. While most attendees are basketball coaches, much of the content is applicable to coaching other sports, and even to leading work teams in the non-sports world. The 2017 guest speaker was Ed Tapscott, a Washington Wizards executive and former NBA head coach. Eastman and Tapscott share experiences from over 50 years in basketball. Panelists include Eastman, Tapscott and college coaches Mike Rhoades, Chris Mooney and Raphael Chillious. Learn more @ Elite Training Camp

The Coach

kewe4

Kevin Eastman

NBA and College Basketball Coach 35+ Years; Speaker to Sports and Corporate Teams (kevineastman.net)

Corporate, College and Sports Team Speaker with 35+ years experience in coaching, including: 13 years in the NBA; Los Angeles Clippers: VP of Basketball Operations and Assistant Coach; Boston Celtics Assistant Coach - NBA Championship 2008, NBA Finals 2010, coached two NBA All-Star games; 11 Years College Head Coach; 11 Years College Assistant Coach;; 4 Years College Director of Athletics. Book this course....


Wednesday, April 23, 2025

US Sports Basketball: Two Great Game Situational Workouts For the Basketball Offseason and Lakers Vs Timberwolves Game 2 Highlights

 The NBA Finals, UFL Kickin' It, Baseball And More Now Streaming On US Sports Radio

  • By Grant Young

With the final buzzer of the season now silent, many players and teams might feel tempted to take an extended break from basketball. However, the champions of tomorrow are made during today's offseason. This period presents the perfect opportunity to address weaknesses, refine strengths, and build the foundation for next season's success through basketball workouts.

Generic training routines often fail to translate directly to in-game performance. Game situation-specific workouts create a bridge between practice and actual competition by:

1. Targeting real weaknesses exposed during the season

2. Creating muscle memory for high-pressure situations

3. Building decision-making skills that traditional drills might miss

For individual players, this means breaking down your game film to identify specific situations where you struggled. Did you have trouble finishing through contact? Were your defensive rotations slow? Did your shooting percentage drop in clutch situations? Each weakness requires tailored drills that replicate those exact game conditions.

Teams benefit equally from situation-specific training. If your squad struggled with breaking full-court pressure, design drills that simulate that exact scenario, complete with defensive traps and time constraints. If fourth-quarter execution was a problem, run scrimmages where the "defensive" team gets additional advantages to create heightened pressure.

The offseason allows coaches to experiment with these scenarios without the immediate consequences of a loss. It's the laboratory where teams can test new strategies and players can develop new skills.

Remember that the offseason isn't just about basketball skills — it's also about building physical attributes like strength, endurance, and flexibility that support your on-court performance.

While it can be tough to know which drills to use in the offseason, heeding the wisdom is respected coaches like Ryan Goodson is a great place to start. 

Coach Goodson has trained more than 25,000 players from youth to the professional levels and has directed youth basketball camps across the globe because of his engaging teaching style and dynamic demonstrations. In 2011, he directed the Stephen Curry Skills Academy.

In his ‘Game Situational Workouts’ clinic, Coach Goodson lists several different drills and workouts that will prepare players for specific game scenarios that will be a massive benefit in the offseason. We have included two of his drills and listed them for you below. 

Idan Ravin Court Vision Drill

One of the drills that Coach Goodson details is what he calls the Idan Ravin court vision drill, which is based on a friend he had who taught this drill to him. 

This drill begins with the player dribbling one ball in each hand while remaining in an athletic stance. The key here is that the player keeps their gaze focused on the rim, the back of the basket, or some other focal point. For more advanced players, a coach can hold up numbers with their hand and have the player call them out. 

From this point, the coach who is in front of the player is going to begin pointing either forward, backward, to the left, or to the right. Once they do this, the player will follow the direction in their pointing, all while remaining facing the same direction and having their eyes focused on the game thing they began the drill looking at.

From there, another variation that can be done is the player dribbling low with one hand and high with another. Then they can switch these hands during their next set. 

The important aspect of this drill is training the player to not be looking down while they’re dribbling, which will be crucial in helping to improve their court vision during their next season. 

Mastering the Escape Dribble

null

A good escape dribble is essential in basketball as it allows players to create space from defenders in tight situations. When executed properly, this skill helps maintain possession under pressure, prevents turnovers, and creates opportunities to pass or shoot. 

Coach Goodman’s next drill addresses this directly. It will start with two cones placed at either side of the free throw line. The player will then take one dribble and make a right-handed layup from the right side and then do the same from the left side, all while keeping their dribble. 

The key for this entire drill is to make each rep one dribble, because being able to extend a dribble while remaining explosive is crucial for the escape dribble.

After the free throw, the player will then extend out to the three-point line and do the same thing as before, all while trying to maintain just the one dribble while driving to the basket. 

Finally, the player will do this from the half-court line. While it may be difficult to do this part with just one dribble, it’s what a player should be working toward and aiming to achieve.


NYSS FB Focus on Fun

Youth sports are a great way for kids to get physical 
activity – and have fun with friends and family. Whether you’re playing a
 game with your kids or coaching a youth sports team, make fun the #1 
priority. Learn about the National Youth Sports Strategy and how you can
 get involved: https://bit.ly/2lIHPUc

Tuesday, April 22, 2025

US Sports Football: Want your defense to get off the field after third down? Sims and Creepers are the answer! And San Antonio Brahmas vs. DC Defenders Highlights

 It's Draft Time! Now Streaming On US Sports Radio!

  • By Keith Grabowski

Having faced a team that used Sims and Creepers myself, I know how effective they can be. I know how much time they can take away from an offense who needs to prepare for them.  It forced us to spend much of our preparation time for our passing game to be sure we could get the quarterback protected correctly, even though at times there were only four rushers.

Perennial Oklahoma powerhouse Jenks High School is back in the state championship again.  Sims and Creepers are part of the defensive package that defensive coordinator Adam Gaylor uses to attack opponents on passing downs.

What is a creeper? Lets’ start with Coach Gaylor’s definition.

Creeper

Zone replace

Use traditional zone blitz patterns

2nd or 3rd level rusher (non traditional rusher)

Instead of just angling and bringing a Linebacker from the field,  it has evolved into a package for Gaylor. It’s a 4 man pressure that allows them to get an extra hook player, force a hot throw and tackle it for a short gain.  Coach Gaylor explains in this video:

Gaylor also uses simulated pressures or “Sims” in this package. 

What is a simulated pressure?

Mainly used on 3rd down calls 

Attack protections

Give illusion of overload pressure

Keep RB in the protection - less receivers out, more coverage

Not looking to be +1, looking to be 1 on 1 getting a rusher to 2nd level of protection

2nd or 3rd level rusher (non-traditional rusher)

He explains here:

Not sure about using these?  Here is a simple Creeper Gaylor calls “Daylight Rush.” It is a small investment for a big reward because of its simplicity.

Rules:

If it’s a Run or Quick, play technique 

If it’s drop back then insert rush

Run at the a gap

Read the center and work opposite of where he turns and end up with a two-way go on the guard

Center blocks you Wrap

Full slide Jump the fence

Coach explains here:

HerbsPro

Overall, the concept is simple, and Gaylor explains the structure they have created. 

Jenks’ Creepers are named after NFL QB:

Flacco - invert from the field with middle of the field closed coverage

Farve - an even front with pressure from the field an middle closed coverage

Brees - CB or boundary safety pressuring with middle field closed coverage

Addy Rat - Double A pressure 

Gaylor illustrates all of these on the board and with game film in his clinic “Sims and Creepers.”

Defensive coaches, if you want an effective way to get to the quarterback while maintaining sound coverage, then Sims and Creepers are for you.

Offensive coaches if you haven't faced these yet, you will and this video can hep you study this effective defensive tool so that you can develop a plan to beat it.

Learn “Sims and Creepers” from Coach Gaylor. It will be easy to see why Jenks loves these and is having success all the way to another shot at the state title.


                              NYSS Every Kid In the Game
All kids deserve a chance to play #YouthSports – 
regardless of their ability. Help expand inclusive programs as part of 
the National Youth Sports Strategy from @HealthGov: https://bit.ly/2lQ85f6

Monday, April 21, 2025

US Sports Baseball: Two Drills to Improve Outfield Movement and Communication and Nationals vs. Rockies Game 2 Highlights

 Has The USA Had Enough Of Men In Women's Sports? Now Streaming On US Sports Radio

  • By Grant Young

While it may seem that playing in the outfield is one of the most relaxed positions in baseball, coaches know the truth is that the outfield demands a high level of communication, precise movement, and acute awareness. This is why outfield drills are so important. 

One of the main challenges for outfielders is the need to effectively communicate with each other. In many situations, multiple outfielders can converge on a fly ball, and without clear communication, collisions can occur. This risk not only poses a danger to the players involved but can also lead to missed plays that could change the outcome of a game. 

Establishing a system of verbal and non-verbal cues is essential for ensuring that each player knows who is responsible for making the catch. Drills that focus on improving vocal communication and instilling confidence in one another can transform a group of individuals into a cohesive unit.

Additionally, the movement required in the outfield is far from straightforward. It involves not only running but also quick direction changes, timing jumps for catches, and assessing batted balls’ trajectories. Outfielders need to have a keen sense of positioning, understanding the hitters’ tendencies, and knowing when to take aggressive routes to the ball. 

Practicing shifts, angles, and the art of the jump can give a team a significant advantage. Drills designed to simulate different game scenarios can help players develop these critical skills, allowing them to react instinctively during actual games. 

By implementing targeted drills that enhance these skills, teams can minimize the risk of errors and elevate their overall performance, turning what is perceived as an easy position into one of the greatest strengths of the team.

While there are plenty of effective outfield drills out there, few focus on developing the communication and movement patterns necessary to ensure safety and success for players of all ages and skill levels. But coach Todd Dulin, Head Coach at North Andover High School (Massachusetts), provides an in-depth, structured approach to mastering defensive excellence in baseball, specifically in the outfield with his ‘Outfield Play with Todd Dulin’ clinic. 

Whether you're an aspiring outfielder or a coach seeking expert drills and strategies, this course provides the knowledge and structure to elevate defensive skills and build a championship-caliber mentality.

We have pulled two drills from Coach Dulin’s clinic and included them below. 

The Rhythm Drill

null

One of Coach Dulin’s drills is called the Rhythm Drill, a fundamental exercise to develop smooth, controlled, and accurate outfield throws while preserving arm strength. 

The movement and footwork involved in fielding a grounder in the outfield and then executing a strong and accurate throw to a specific base may sound easy, but coaches know that it can often be much more difficult than initially conceived. 


Hat Club Style #45849 New Era 59Fifty Fitted Hat Red Crown Black Visor Grey Undervisor Black Sweatband 100% Polyester 


This is why this simple rhythm drill is perfect, which starts with a coach having a bucket of balls, a fungo, and standing at home plate. The players will line up in two lines in the outfield, and the coach will just hit balls to each line. 

Each player will then take turns fielding the ground ball while ensuring they remain on the balls of their feet so they don’t get off balance. From there, they will stay in an athletic stance, execute a crop hop, and deliver a throw to the assigned base, which will have a screen behind it. 

By repeating this drill with a steady rhythm, outfielders enhance their throwing mechanics, reinforce good habits, and prepare for game-like situations with precision and efficiency. 

Another way to improve this drill is by hitting the ball between the two lines and forcing them to communicate on who is going to field the ball and which base they should throw to. 

The Sprinkler Drill

null

The next drill that Coach Dulin discusses in his clinic is what he calls the sprinker drill, which is a dynamic outfield exercise designed to improve tracking, catching on the move, and communication. 

The drill begins with all the outfielders along the right field like, and the coach has a bucket and a fungo. The player who’s first in line will then start jogging across the outfield while fielding multiple fly balls, progressively moving toward left field with each ball hit.

A great way to enhance communication with this drill is to make two different lines and hit the ball either between them or behind them, so that they have to run near the fence. This will force the two players in line to communicate about who is catching the ball and where the ball is while also tracking down the fly ball. 

This drill is especially effective early in the season, when players haven’t learned each other’s communication preferences and are still acclimating to tracking balls down on the fly. 

This drill is also fun and engaging, while also working as a conditioning exercise because of all the running that players will need to do.