2025 NFL Salute to Service Collection
https://bit.ly/4h5sTqH
US Sports Radio affiliate partner
http://www.USSportsRadio.net

2025 NFL Salute to Service Collection
https://bit.ly/4h5sTqH
US Sports Radio affiliate partner
http://www.USSportsRadio.net


These are the facts - most of us choose to play on the field instead of training. A quick warm-up and a walk to the round now that we've managed to go golfing. Therefore, it is worth using the winter to develop better hitting technique. Because if not now, then when?
Are you procrastinating on training during the golf season? No wonder, each round of golf is a new adventure, different challenges and a chance to make unforgettable memories. I guess none of us counts on the shot of a lifetime on the driving range. The other side of the coin is that without proper training, at some point our fitness will stop improving. That's why winter is the perfect time to improve your technique, strategy, and learn some new shots. Since even the best in the world train on simulators in winter, maybe it's worth taking the opportunity to prepare for the upcoming season now?
You don't have to swing faster to hit farther. What's more, you don't have to hit further to play better. It is important that the way you strike is as efficient as possible. If the ball's trajectory is too high or low, it will affect the distance and rolling path. An off-center hit on the clubface will affect both direction and distance. TrackMan and the "Optimizer" function come to the rescue, which, based on millions of recorded shots, determines the optimal parameters for the selected club and for a given swing speed. Thanks to this, we know, among other things, at what angle the ball should take off, what speed should be expected, how much backspin will be just right and what its maximum height should be. We can also choose our height preference - whether we want to play low shots preferred on links courses, or hit high and spectacular shots like Rory McIlroy.
There will probably be more than one occasion when you send the ball under a tree and have to play low. Use a few simple tips to launch the ball much lower and see how the "Launch Angle" parameter changes.
a. Stand narrowly, place the ball closer to your back foot, put more weight on your front foot and lean towards the target.
b. Try to keep your weight on your front foot throughout the swing, and end the swing with your hands stopping much quicker.
If you are not a player who relies on feel for short games and you need an effective distance control system, the Pelz technique comes to the rescue. With TrackMan, you'll know exactly what distances you're hitting using the simple analogy of a clock. If your head is 12 o'clock and your feet are 6 o'clock, learn to swing the club to three different lengths and - very importantly - feel the right swing length so that you don't have to check in the mirror to see if you're wrong by a few minutes.
Hit a few balls with each swing and see the average distance the ball travels. Of course, discard the missed shots, because we're not interested in those. If you have 3 or 4 wedges in your bag, measure each club - you will know 9 or 12 constant distances. Pay attention to the "Carry" parameter, i.e. how far the ball flies in the air, and thanks to good judgment you will know where to land the ball so that it rolls as close to the hole as possible.
Adam Mitukiewicz, Fully Qualified PGA Golf Professional
Full article (polish version) at https://www.mitukiewicz.pl/golfandroll/2024/2/14/opanuj-swoj-gr


Defending in today’s high-speed game shouldn't be the sole responsibility of the blueliners. Successful teams need 4 lines and 3 pairs who are willing to work hard to get to their defensive positioning, control the gaps, and make a considerable difference for their team. The article explains the core principles of hockey gap control, angling, zone coverage, and defensive responsibilities, presenting practical examples from any coach or player who is looking to improve their defensive skills.
Why Defensive Skills Matter for Everyone
The best teams cannot perform at their highest level without all five skaters contributing defensively. Whether you are applying pressure on the forecheck, distributing through the neutral-zone, or providing support in the defensive end, it is important that you know how to angle, track, and close space. It is not about blocked shots or big hits, but rather about constantly being at the right place at the right time.
Steering, Angling, and Tracking: Dictating Play Before the Zone
The first step to smart defense starts long before your opponent enters the zone. It begins with how you steer and angle the puck carrier. In this featured video breakdown, players are taught to:
Influence direction through stick and body position. Stick out front, feet angled—forcing the attacker into less dangerous ice.
Angle with intent. The goal isn’t to chase the puck, but to guide it. Good defenders dictate where their opponents can go.
Track with awareness. Head on a swivel, inside shoulder in control—players must match speed and keep inside body position during backchecks and transitions.
This way of skating definitely enables defenders to maintain the offensive player on the perimeter and out of the dangerous areas. That’s the concept of good hockey gap control—limiting the space without overextending or getting beaten on the side.
Coaching Cue: Visualize angling as not only helping you follow the puck carrier but also allowing you to give him/her the correct direction—be it towards the boards, towards your teammates, or to a place from where he/she can’t make a play. Don’t merely respond. anticipate and affect.
Defensive Zone Coverage: Roles, Layers, and Readiness
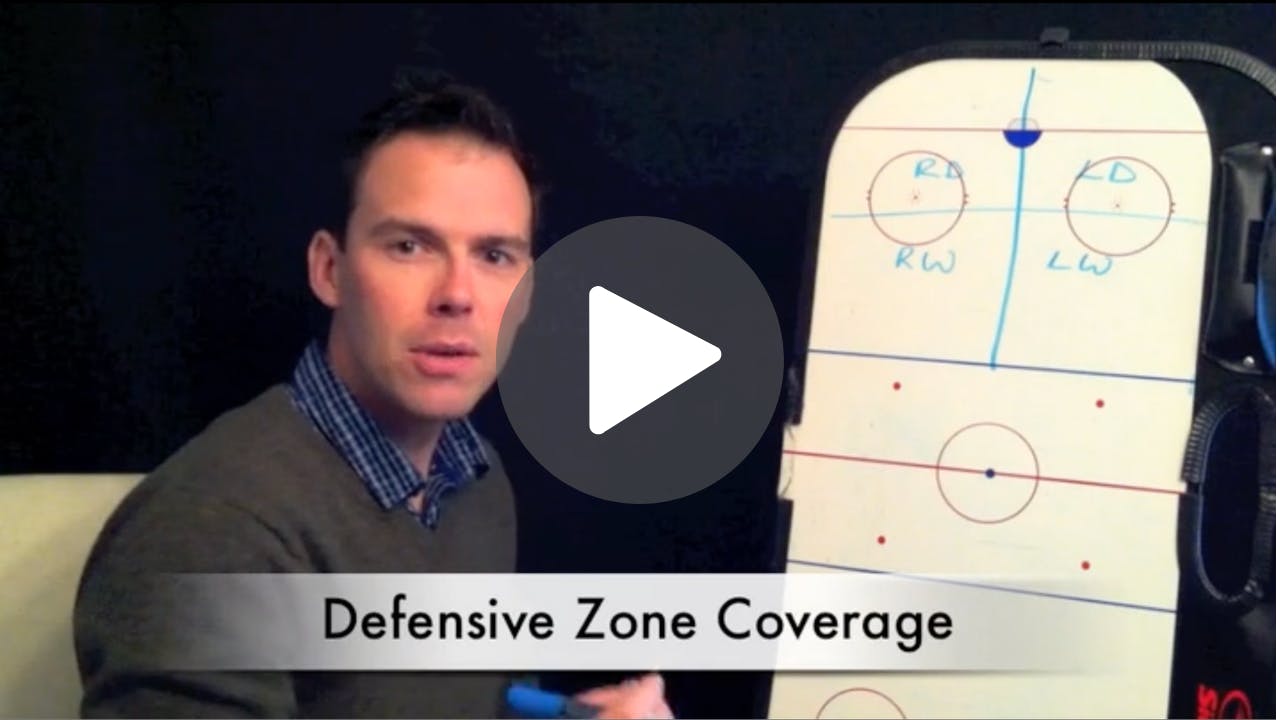
Once the play shifts to the defensive zone, smart hockey defensive positioning principles become even more important. The second video clip outlines a layered, role-based approach, breaking down responsibilities into four main roles:
- First Defender (Puck Pressure): Applies pressure immediately but stays under control—stick in the lane, eyes on puck and body.
- Second Defender (Support): Protects the middle, reads the puck carrier’s next move, and supports if the first defender is beaten.
- Third Defender (Slot Protector): Anchors the net front, maintains body position, and eliminates inside threats.
- Fourth and Fifth (Off-Puck Awareness): Communicate, read rotations, and pick up open players—ready to jump or switch coverage.
Coaches often teach this as a box or diamond concept, with defenders shifting in unison rather than chasing individual opponents. How players move and shift is dictated by puck location and teammate pressure, not emotion or panic.
When to Close vs. Contain: Reading the Play
Among the most commonly misunderstood defensive concepts is knowing when to redirect the puck carrier and when to attack them. Skillful defenders not only work hard, but they also work smart, reading their support and adjusting accordingly.
Pressure when: You have help, the puck carrier is near the boards, or you're on the strong side.
Contain when: You’re outnumbered, far from help, or risk opening up the middle.
This kind of decision-making is what binds together a team that plays strong defense. The video clearly points out that “Defensive coverage is more about who has support than just who’s closest to the puck.”
5 Habits to Emphasize with Players
To wrap things up, here are five essential habits that coaches, parents, and players can reinforce at every level:
- Angle early and angle smart. Don't wait until the attacker reaches the blueline, start influencing the puck carrier as early as possible to kill any chance at making a play.
- Close the distance between you and your opponent’s feet, not just the stick.
- Know what your task is in the zone—pressure, support, protect, or read.
- Use your stick with a purpose, steer attackers away, and don't get caught fishing for the puck.
- Communicate early and often. Rotations are only effective if all the members understand the plan.
Go Deeper with Defensive Tactics and Concepts
In addition to the principles we just covered, the course goes into:
- Playing without the puck and how to dictate play defensively
- Defensive coverage concepts like body position, stick placement, and angling
- Zone reads and rotations based on pressure and support
- How to structure effective breakouts under pressure
- Core concepts that unite defensive systems at all levels
- A full progression from zone play to breakouts, and eventually special teams
Whether you are coaching or playing, these ideas assist in creating a common language for comprehending the game and improving your defensive decision-making.

%20Plays%20For%20100225.jpg)
There are plenty of components when it comes to playing a game of soccer. From dribbling to shooting, continuously practicing these skills can enhance your performance on and off the field. Some of these can improve individual performance, but passing can grow both individual and team skills as a whole.
Passing/possession drills can improve the team’s communication skills, attentiveness, first touch, and even their connection on and off the field. Being able to pass the ball accurately and precisely can affect the team’s performance and quality during practice and games. If you watch professional soccer teams on television, you can see how the passing just flows so swiftly between the players. These players know precisely how and where to pass to their teammates, but they have also had plenty of practice and developed a connection within their team. Building a strong bond with your team, being focused, and lots of practice can help build strong passing skills during the game.
Coaches must implement passing drills during practices. There are plenty of drills to choose from, depending on your team’s strengths and weaknesses, and a range of variations within each exercise. With the continuous passing practice, each player will develop a new and vital skill as well as building upon that necessary team bond.
There is a multitude of different passing drills to have your team work on. Here are three soccer passing drills that you, your team, and your coach can work on during practices to perfect passing:
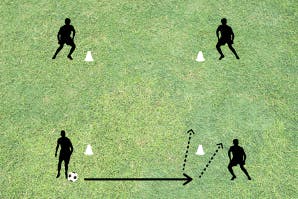
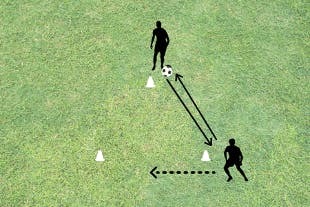
Before You Start
Equipment:
- 4 cones
- 1 soccer ball (or more for variation)
- 4 players (or more for variation)
The Set-Up:
- place the four cones in a 10x10 grid, each player on each cone to start.
How It Works
- Begin with one player at each cone
- One player starts with the soccer ball at their cone.
- The player with the ball will pass it towards the cone either to the left or right of them (determines which direction you desire to start with. In the diagram above, the player is passing to the right).
- The receiver is able to use either the inside or outside of their foot while receiving the ball from the passer.
- The receiver may go behind or in front of the cone, shown as the dotted lines in the diagram above. The cone represents the “mock defender” in which the player is trying to move around.
- The receiver, once taking their first touch behind or in front of the cone, then passes the ball to the next receiver, repeating this process around the square.
Switch It Up
- Number of soccer balls. Adding more soccer balls can create a quick drill to challenge your players’ attention and communication skills
- Number of players on each cone. Decreasing the number of players creates a faster-paced drill or increasing to build a better team connection
- Call out a change in direction during the drill. This can help the players work both left and right feet and test their reaction skills
More Tips
- Get the players to communicate! This is a great drill to work on the team’s communication skills. The players can say “Ball!” “Here!” “Left foot!” “Right foot!” and more.
Before You Start
Equipment:
- 3 cones
- two players
- one soccer ball
The Set-Up:
- Place 3 cones in a pyramid shape, with two players on separate cones
How It Works
- One player is at the top of the pyramid with the soccer ball; the other is on either the left or right bottom cone (whichever one you wish to start with)
- The top player will pass the ball towards the player when at the cone.
- The receiver will take a touch, then pass the ball back to the top player.
- After passing the ball back to the top player, the bottom player will then sprint to the next cone to receive the ball once again.
- Repeat these steps until the time is up (approximately 1-2 minutes), switch roles from the top stagnant player to the moving bottom player.
Switch It Up
- Number of touches. Switch from a two-touch pass to a one-touch pass for quicker, more controlled movement
- Number of players. Instead of sprinting back and forth between cones, there can be three players on the drill to pass in a triangle structure
More Tips
- Make sure the receiver takes a light and controls the first touch. Do not want the ball flying around towards the opponent
- Communicate. Let the passer know which foot you would like to receive the ball on (“Left!” or “Right!”)
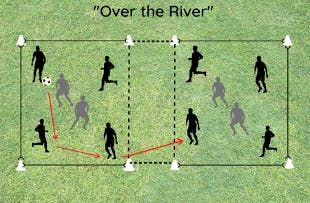
Before You Start
Equipment:
- 8 cones
- 12 pennies (8 one color, 4 a different color)
- 12 players
The Set-Up:
- Make a large 20x30 rectangle
- Create a 2x10 boundary in the center of rectangle
- 4 attacking players and 2 defensive in each box
How It Works
Soccer ball starts in either box with the offensive team (team with four players in each box). The defensive team has two players in each box, the rest of the team sits out for the round.
The offensive team must complete at least three passes within their box without the defenders taking the ball.
After connecting three complete passes, the offensive team’s objective is then to pass the ball to the other box without letting the defensive team take the ball.
The defenders are trying to take the ball away from the offensive team. If the defenders take the ball three times within the same box, the positions must switch (offense becomes defense, defense becomes offense).
The only way to switch roles is for the defense to steal the ball away from the offense.
Switch It Up
- Limit the number of touches. Limit to one-touch passing for a high-intensity game
- Adjust grid size. Make the grid smaller and tighter for quick passing or larger to work on long passes and time awareness
- Make the offensive team “loft” or “chip” the ball over the middle-dotted line area towards the other box after completing the three passes. This works on lofting skills and first touch out of the air.
Additional Videos on Soccer Passing:
Winning Soccer Vol. 5: Passing, Receiving, and Heading
Paul Riley's Soccer Moves, Skills, and Drills
Soccer Drills & Tips Video Library
World Cup Soccer with Mia Hamm
Passing is the route of all things great in soccer, so there will be aspects of passing in every drill that you do. When your players start to grasp the fundamentals of passing, you can start to progress into more tactical methods of passing. This includes positioning and areas that you want to exploit.
If you are interested in the more tactical side of passing, Coach Kadioui's course, Football (Soccer) Play Styles - Possession is a superb course.

Shop now @ https://bit.ly/SimplyWholesale1025
US Sports Radio affiliate partner
http://www.USSportsRadio.net


For nearly four decades, Tom Hays has been the quiet architect behind the University of Kansas's remarkable pole vault coaching dynasty. His journey from promising athlete to legendary coach embodies the perfect marriage of technical precision and psychological insight that defines elite coaching.
Hays's approach begins with fundamentals. Early in his career, he recognized that the pole vault isn't merely about raw athleticism but requires a methodical building of skills. He developed a progressive teaching system that breaks down the complex movement into learnable segments—grip positioning, approach rhythm, plant technique, swing mechanics, and finally, the commitment to inversion.
What distinguishes Hays is his embrace of both science and artistry. In the 1990s, when biomechanical analysis was still emerging, he was already filming his vaulters, analyzing frame-by-frame movements to identify inefficiencies invisible to the naked eye. Yet he balances this analytical rigor with an intuitive understanding of how each athlete learns differently.
"The pole vault is physics in motion," Hays often tells his athletes, "but the vaulter is human." This philosophy informs his individualized coaching style. For some athletes, he focuses on technical cues; for others, he cultivates the psychological fortitude needed to hurl oneself nearly twenty feet into the air.
His training facilities at Kansas have evolved from basic pits to high-tech laboratories featuring specialty equipment and computer modeling. But Hays maintains that the most valuable coaching tool remains attentive observation—watching how an athlete responds to instruction, adapts to challenges, and demonstrates readiness for progression.
The results speak volumes: dozens of All-Americans, multiple national champions, and Olympic qualifiers, along with his securing the nation’s No. 1 men’s pole vault recruit for three consecutive years at one point in his career, ensuring continued excellence in Kansas’ jumps program. More impressively, many of his former athletes have become successful coaches themselves, spreading his methodology throughout the sport.
Coach Hays’ ‘Tom Hays - The Art of Coaching the Pole Vault’ clinic explains the art of coaching this challenging sport and offers insights into athlete evaluation, coaching technique improvement, and simplifying complex movements. He emphasizes the importance of self-evaluation, clear communication, and eliminating unnecessary elements.
We have pulled some lessons from Coach Hays’ clinic and included them for you below.
3 Check Points to Look For
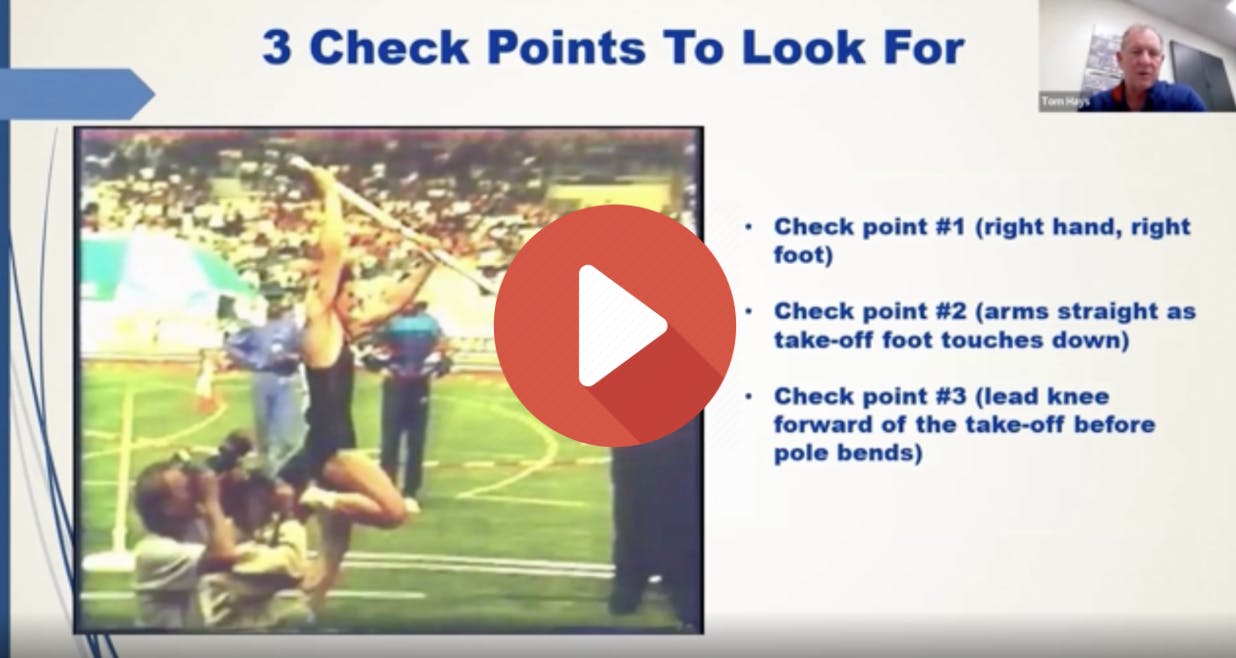
At one point in his clinic, Coach Hays discusses three check points to look for what an athlete is executing their pole vault.
Check point number one is that if the athlete is right-handed, when they land on their right foot in the step before takeoff, the hand is going to be somewhere around the runner’s forehead.
Most athletes have a tendency to have their hand closer to neck height, which is about eight inches away from where they should be and which will make them late in their plant.
Thankfully, this is a very easy thing to spot when watching film as it will be extremely apparent. But there are other nuances, such as the speed and rhythm are also important to diagnose and get right.
The second check point is when the runner lands on their takeoff foot, their top arm is extended close to straight. While many runners have a completely straight arm (which is okay and which Coach Hays teaches his athletes), Coach Hays explains that it’s also all right to have a slight bend if that’s what the athlete feels most comfortable doing.
The top arm should be up over the runner’s head in a high position, regardless of how bent the arm is.
The third and final check point is that the lead knee (or the drive knee) is before the takeoff foot leg before there’s pressure or bending in the pull phase. Coach Hays then discusses how, while some people don’t drive their knee correctly at this point, their hips are rising enough where it does the same mechanical work instead.
“The more pole speed you have, the more potential fly-away speed you’ll have,” Coach Hays said. He then quoted a coach who said, “Energy in, energy out.” In other words, the more energy and speed you can put into the takeoff, the more energy you’re going to get out of the pole.
Coaching Athleticism

When it comes to coaching the pole vault, Coach Hays says that it’s important for an athlete to only have one voice they need to listen to, instead of multiple coaches telling them what to do. In order to ensure this, a coach will want to be very direct and specific about what they want their athlete to be working on on any given day.
He also said that stress can be a good thing when it comes to an athlete learning. However, it’s important to understand the difference between good stress and bad stress. Good stress is competition between peers or opponents, or working hard in the weight room or on the track. Bad stress can be external pressures that a coach puts on their athlete.
He also discusses that if a coach puts a camera on their athletes while training so that they know there will be film of them, they’ll be more inclined to focus on their mechanics and develop good habits. This is another good type of stress.
Finally, a tired athlete doesn’t learn very fast, so fitness needs to always be a focal point. And Coach Hays adds that rhythm (or a lack of rhythm) always overcomes effort.

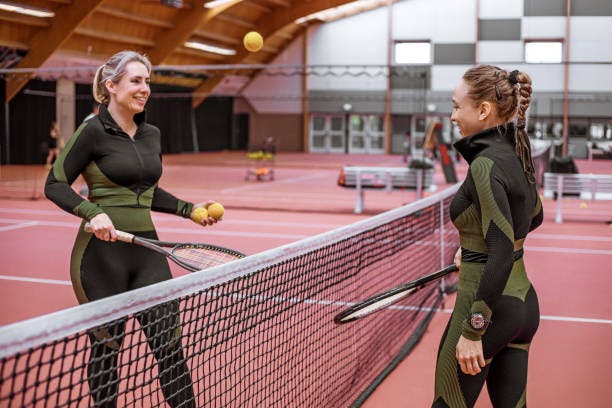

When it comes to tennis, a sport that requires intense concentration and a high level of athletic abilities, it’s important for coaches to know what to practice and work on with their players. Listed below are tennis drills that every coach should exercise with their players to help maximize their tennis play.
Warm Up
Before playing tennis, or any sport for that matter, it’s a good idea to have some form of cardio as a warm-up. Running is an excellent way to get the blood flowing and ready yourself for the battle ahead. I suggest taking a few laps around the court before moving on to arm exercises or practicing technique.
For this drill, you should have at least three tennis players. Keep in mind, the more players the better. Spread out in a circle, the further away the better. One player starts with the ball and randomly hits it to another player. The goal is to only let the ball bounce once before being hit again. Try adding objectives like having players call out the name of the person they are passing to before the pass. To make it more competitive, have anyone that fails an objective sit down for the remainder of the drill. Last player standing is the winner.
Improve Ball Control with the Bouncing Ball Drill
This is a simple drill that will require teams. If you have less than ten players, then get into groups of two. If you have more than ten players, get into two teams. Once the teams are set, have them spread out along the baseline so they are facing the net. Mark a cone that faces each team and place it near the net. The goal of this drill is to dribble the ball with your racket from the baseline to the cone near the net without losing control of it. Once players circle the cone and make it back to baseline, they will tag the next person on their team. Repeat until each team member has gone. The first team to finish is the winner.
Increase Accuracy with the Crosscourt Drill
This drill will require players to pair up and have a court to themselves. One player will start as the “server” and the other one will do the hitting. The server will hit the ball accurately to the other player’s forehand or backhand side. That player will then attempt to hit the tennis ball crosscourt. Repeat this for a set amount of turns with the server counting how many shots are successful. Once the first player has finished, switch positions. Try to beat your opponent and also try to beat your own high score each time you attempt it.
Incorporate “Simon Says” into your Drills
This drill is simple to perform and also very beneficial to a tennis player’s backhand and forehand strokes. To start, have your players line up horizontally along the service line, with the coach on the opposite side of the court. The coach’s job is to feed the balls to the players. Before the ball reaches the player, he must yell out whether the player should volley it or groundstroke it. By doing this, tennis players will build a better reaction time and will also improve their stroke techniques.
Improve your Serving Technique and Accuracy
With this simple serving drill, tennis players will gain the ability to pinpoint where they would like to serve it. This will become very handy during a match. This drill can be done with or without a partner, but if you decide to do this drill alone you better make sure you have a good amount of balls with you! To set this drill up, draw a good-sized circle in each of the four service boxes. These will be your targets when you serve so put them in different spots. The goal is to serve the ball into the circle you created. If you serve it outside of the circle, count it as a fault. If more than one person is included, make it a competition by seeing who can hit the circle the most.
Mini-Games of Tennis Help Simulate Real Match Play
This drill is simple and will help you be more accurate when playing a match. You will need either two or four people to do this drill. The game will be played like a regular tennis match, except the double match line won’t count. If the ball enters anything but the service box, then it’s a point to the opposing team. Try to keep the ball in the service line as long as possible to try and defeat your opponent.
Hand-Eye Coordination is Key to Tennis
For starting this exercise, have one player stand on the end of the service box and another player positioned on the baseline. Begin by throwing the ball to your partner, letting the ball bounce only once. Try to stand in the same spot while doing this to improve accuracy. After that, throw the ball to your partner, but have him hit the ball back to you. Try to catch it after he hits. After a few rounds, switch positions and do it vice versa. Finish up by hitting it back and forth, letting the ball bounce only once.
Become More Agile and Quick on the Court
To begin here, have your players get into pairs. Have one player stand in the center of the court on the service line. Have the other player stand opposite of him. Your partner will start by hitting the ball to the far side of the court (they choose the side). You must then chase after the ball and hit it back to your partner. As soon as you hit it back, return to the middle. Repeat this back and forth, switching positions every now and then.
The Serving Game
This next drill is a serving game. It’s very easy, but also a good way to improve your serving. Split your team up into two teams. Have them stand on opposite sides of the court ready to serve. Have one team serve one by one, counting how many are successful and how many are not. Next, have the other team serve. Whichever team has the most successful serves, wins.
Serve and Volley Style
Despite the serve and volley approach becoming less common, many of the elite players still have it in their arsenal, including the great Roger Federer. I’m not stressing to use it 100%, but it can help develop a more well-rounded player. For the drill, you need one player on each side of the court. Have one player serve the ball and then the other player can return it with a number of different shots. No matter whether it’s a crosscourt forehand or a lob, the serving player should rush the net and look to hit the ball before it bounces. After the server receives around 10 reps, then switch roles. As a side note, remember the surface you’re playing on. For games on clay, you might want to play out longer rallies, as opposed to hard or grass.
DON’T BE AFRAID TO TRY SOMETHING NEW NEW
All of these drills listed here serve a purpose of improving one’s tennis abilities. However, it is important to continuously be working on different exercises that focus on what your team needs. If your team is consistently getting double faults, then serving drills increase in importance. At the same time, don’t be hesitant to do a little research on your own.

I am sure you watched plenty of football this weekend beyond the countless hours of film grading and breakdowns.
In a weekend full of shake-ups and upsets in college football, one game that many people may have missed was Presbyrterian College Blue Hose vs. St. Andrew’s Knights.
WHO?
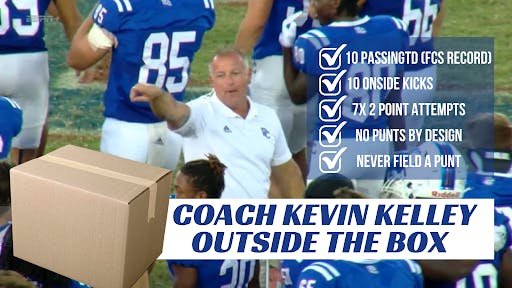
Presbyterian is in their first season as an FCS team, and St. Andrew’s is an NAIA team. Presbyterian is coached by Kevin Kelley, the 9x state champion head coach of Pulaski Academy also known as “the coach who never punts.”
This was Coach Kelley’s first game as a college head coach and the test of his high powered offensive system and his outside-the-box strategies. As a reminder of those strategies:
Never punt
Go for two on most tries after touchdowns.
Onside kick after most touchdowns
Never field a punt
So let’s get right to it. How well did his strategies translate to the college level?
Offensively, the Blue Hose set an FCS record passing for 10TD. The craziest part is QB Ren Hefley threw his tenth TD early in the fourth quarter and could have easily thrown more. He finished the game 38/50 for 538 yards and 10 touchdowns.
Coach Kelley explains that what they do is unique. He describes it as “a defender read passing game with a few progressions in it.” Watch his overview of the passing game here (click on image for video):
We will review some film this week and confirm how much of this is the same as he’s done, but knowing Coach Kelley’s convictions, we expect most of it to be. In watching the highlights it looks to be with plenty of the touchdowns coming from empty and quads.
When asked about his offense post game, Coach Kelley had this to say:
“We do a lot of things on offense and I was really worried that in that amount of time, in 25 NCAA practices we could put all that stuff in and be able to do it effectively with minimal amount of mistakes on the field, and the good thing is, it’s designed to be so much that you can make mistakes and still be successful because if you give them more things to look at on defense then they’re going to make more mistakes too.So even if you make some it counter acts and you have a chance to be successful.”
Here is Coach Kelley explaining their high percentage clearing concept from his quads attack. They certainly used this one last Saturday:
Special teams is where Coach Kelley breaks from traditional strategy and he continues what he did at Pulaski:
Presbyterian attempted a 2-point conversion after six of its first seven TDs (converting three of them). Coach
The Blue Hose tried an onside kick after its first 10 TDs (going 1-for-10). Coach Kelley explained exactly why he believes in this strategy in the following video:
When asked post game what he was going to do to increase the onside kick recovery, Kelly replied “Well I am going to add some more onside kicks. I only had three in, so we are going to add some.”
This is an area that Coach Kelley studied and researched. He explains exactly why they like the onside strategy here. It is the single most factor in whether they will win or lose:
The Blue Hose never punted. In fact, Presbyterian didn’t even list a punter on the two deep.
In addition, PC didn’t field a punt.
The sample, is small, one game, but I don’t expect Coach Kelley to change. He’s made a career on doing what he believes, doing it his way, and most importantly getting his team to believe in it.
There’s always plenty to learn from and we hope you takeaway something that can help you this season.
Here’s to his and your continued success!

 " "
" "