Now Streaming On US Sports Radio!

US Sports Net Today!


Live Play-by-Play, Updates, Highlights and More! on US Sports Network!
[Chrome Users-You may have to click on the play button twice to listen]
US Sports Network Powered By Gorilla Sports!


US Sports Radio
The Las Vegas Raiders Play Here
Fitness and Sports Performance Info You Can Use!
The Scoreboard Mall
The Rock Almighty Shaker Of Heaven And Earth!
The Coolest Links In The Universe!

Saturday, August 9, 2025

US Sports Track And Field: The Ultimate Guide to Coaching Track and Field and Noah Lyles stares down Kenny Bednarek in TESTY 200m at USATF


  • By Jackson Chlebowy

Whether you’re stepping onto the track for the first time as a head coach or you’ve been guiding athletes for a season or two, this guide will equip you with practical strategies, training techniques, and motivational tools drawn straight from real-world coaches. 

_________________________________________________________________________________________________________________

1. Foundations of a Successful Program

Every outstanding track program starts with well-defined expectations, a consistent structure, and a culture that values accountability.

Set Team Size & Standards

• Quality over quantity is key. Limit your roster size to ensure effective coaching.

• Instead of using punitive measures, consider tryouts or “programming cuts” to manage team size. Establish clear standards for your athletes. If your coaching staff is small, prioritize athletes who are eager to work hard and compete, rather than just those with the most talent.

Define Roles

• If you have assistant coaches, assign them based on their strengths (like throws or jumps).

• In situations with only one coach, empower senior athletes or experienced parents to take on “player-coach” roles. Let senior athletes lead warm-ups and help keep their teammates focused and on track.

Communicate Clearly

• Provide weekly schedules, practice goals, and meet expectations in writing.

• Encourage athletes to monitor their own times and workouts—this helps them take ownership of their progress.

_________________________________________________________________________________________________________________

2. Warm-Up & Mental Preparation

A solid team warm-up goes beyond just preventing injuries; it gets both the body and mind ready to perform.


Holistic Warm-Up (15–30 minutes)  

Dynamic Movements:  Forward A-skips, B-skips, high knees, and butt kicks.  

Lateral & Backward Work:  Karaoke, side shuffles, and backward high knees.  

Prehab/Activation:  Hip bridges, fire hydrants, 90/90 hip rotations, and plank rotations.  

Sport-Specific Drills:  Setting up mini hurdles (“wickets”), track strides, and bounding.  

Mental Readiness  

• Give athletes a moment to transition from classroom mode to performance mode.  

• Include partner stretches or light group games to foster team spirit.  

• Use cues like “good afternoon” or “prime time” during warm-ups to signal to athletes that it’s time to get to work.  

_________________________________________________________________________________________________________________

3. Training Phases & Planning  

Organize your season into clear phases to effectively balance building a strong foundation, enhancing speed, and reaching peak performance during competitions.

null

Weekly Structure

Monday: Recovery/Easy (Varsity recovery vs. JV long run)

Tuesday: Speed/Intervals or Hills

Wednesday: Mid-long run (~20% of weekly mileage)

Thursday: Sprint/Technical or Tempo

Friday: Optional light run or rest

Saturday: Races or simulation

Sunday: Day off or optional easy run (depending on team culture)

_________________________________________________________________________________________________________________

4. Event-Specific Techniques

Throws: Tailored Warm-Up Routine

Before stepping into the ring, take the first 5–10 minutes after your general warm-up to focus on shot put-specific prep.

Key Focus Areas:

 • Posture and body control

 • Hand and wrist flexibility

 • Mental transition from general warm-up to technical work

Drills to Incorporate:

 • Standing throws that emphasize balance

 • Wrist flicks and release mechanics

 • Position drills that highlight a tall spine and core stability

Coach's Insight:

Make sure to dedicate extra time to wrist and hand preparation to avoid potential hand/wrist injuries.

Implementing Progression – From Heavy to Light

To enhance both strength and feel for the throw, the Coach suggests starting with heavier shots at the beginning of the season.

Progression Breakdown:

Heavy Shots – Build strength and identify balance weaknesses

Competition Weight – Fine-tune posture and rhythm

Lighter Shots – Concentrate on speed, timing, and release

Key Focus Areas:

 • Use drills to sense positions throughout the throw

 • Create a rhythmic “slow-to-fast” sequence

 • Reinforce posture for a balanced, repeatable effort

Coach's Insight:

Using heavier implements is especially beneficial for glide throwers early in the season. They help challenge balance and timing before moving on to lighter balls as the season progresses.

Seasonal Throw Progression

Early Season:

 • High volume of breakdown drills

 • Focus on posture, balance, and control

Mid to Late Season:

 • Fewer drills, more full throws

 • Shift focus to rhythm, speed, and competition-specific cues

Throws & Power Drills – Phil Olson

Building power in the ring starts with rhythm, timing, and body control. For beginners, simplified drills lay the groundwork for more complex movements down the line.

Resistance Band Simulation Drill

Setup: Attach a long resistance band from the athlete’s waist to their throwing hand (or use a handheld version if needed). This simulates the movement pattern of a rotational throw.

Focus: • Reinforces full-body connection during the throw • Encourages a straight-line path from wind-up to release • Trains rhythm and force application through the legs and hips

Coaching Tip: Keep tension smooth—not jerky. Focus on turning the hips first, then shoulders, finishing with a tall release.

Half Power Block Drill – For Discus & Rotational Shot Put Put

Setup: From a half-power position (hips and shoulders open to ~90 degrees), have the athlete focus on timing the drive from the right foot with a strong block from the left arm.

Focus: • Hips open, left arm extended toward the sector • Right heel lifts, hip drives through the throw • Strong left-side block stabilizes and adds torque

Coaching Tip: If the shot/disc path is off-line, the athlete will lose speed and control. Emphasize finishing tall and keeping everything in a straight line.

Stick Drill to Power Position – Phil Olsonlson

Focus: • Simulates throw with stick or med ball • Emphasizes tall finish, full extension, and proper posture

For more great drills and teaching points for shotput and discus, check out Phil Olson's full clinic, ‘Discus and Shot Put Training for the Young Thrower’.

_______________________________________________________________________________________________

Jumps

High Jump Prep

Monday: Speed/form runs & approach drills (shoulders back, hips forward).

Tuesday/Thursday: Technical approach + 2–3 step drills, strength work.

Wednesday: Speed endurance (e.g., 50-200m) to build runway tolerance.

Long/Triple Jump Daily

• 1-2 practice jumps integrated with team warmups—discover new talent.

Takeoff Position & Rhythm Drills – Brad Hackett

null

Getting the takeoff mechanics just right is crucial. Coach Hackett really stresses the importance of driving that swing leg, keeping the shin angle around 24 degrees, and hitting a strong, upright position at the board. 

Progression:

One-Step Takeoff Drill

 • Make sure to nail that takeoff posture every single time

 • Cue: "Opposite jacket" – think of your arms and legs working together

Three-Step Pop-Ups

 • Add some speed and rhythm while sticking to those takeoff mechanics

 • Breathing cues: “Breathe to one, breathe to one”

Flight Drills & Arm Mechanics

These flight-phase drills are all about improving your posture, controlling your hang-time, and perfecting your arm action while you're in the air.

Drills:

 • Walking Arms – Walk around with your arms mimicking the flight phase, keeping your posture tall

 • Wall Plant Drill – Face a wall, simulate your takeoff and arm sweep while maintaining that tall stance

 • Combined Pop-Ups – Connect those three-step pop-ups with your arm mechanics for real-time control

Landing Progressions

Landing is often overlooked, but bad form can really cost you distance. Coach Hackett has laid out three landing progressions to help teach extension and control.

Drills:

3-Step Jump to Bowl/Tire

 • Helps athletes learn to land with arms up and legs extended

 • Cue: “Land with the heels, dig with the toes”

Ankle Grab Landing

 • Sprint down a 6–8 stride approach, jump, grab your ankles midair, and land in the pit

 • This builds awareness of body positioning and full extension

Seated Landing Drill

 • Sit on a box or chair, lean back, and reach forward with your arms and legs

 • Get a light push from a teammate to help you reach even further

Coach Tip:

When you land properly, you should leave even marks in the sand—your heels, hands, and hips should all be in line. If your toes leave a drag mark behind your heels, it means you didn’t fully extend.

These drills can be practiced year-round, even if you don’t have access to a sand pit. For more technical cues, posture adjustments, and in-place progressions, check out Brad Hackett’s full clinic ‘Long Jump Skills & Drills’. 

_________________________________________________________________________________________________________________

Sprints & Acceleration

3-Point Starts & Acceleration Mechanics – Jerome Missaien

null

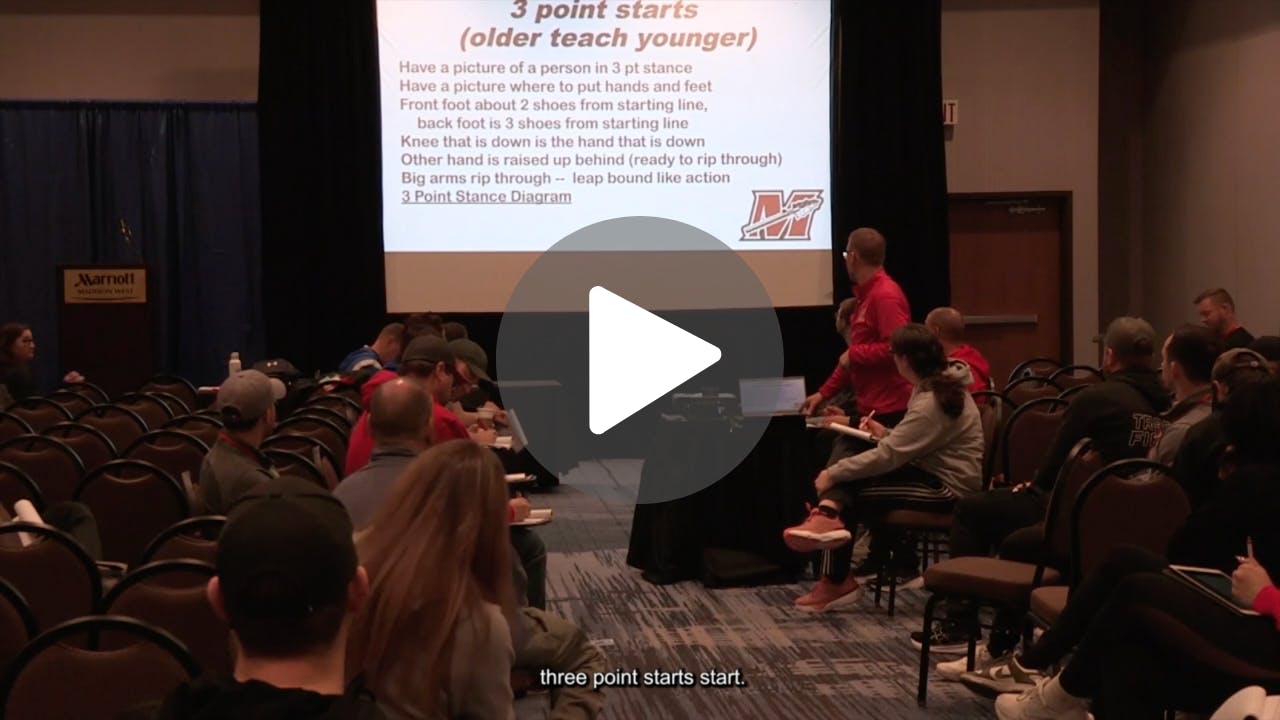
Mastering the sprint start isn’t just for elite athletes; it’s a crucial skill for any runner looking to boost their acceleration. Coach Missaien shares a straightforward, easy-to-follow method for establishing a solid 3-point start and seamlessly incorporating it into your sprint drills, even if you don’t have blocks.

Setting Up a Reliable 3-Point Start

Coach Missaien introduces a simple approach to help athletes build consistency from the ground up:

Drill Setup 1: Chalk Line Method

1. The athlete positions themselves at the starting line.

2. Measure back two shoe lengths and mark that spot with chalk (this is for the back foot).

3. Measure one more shoe length back and mark that for the front foot.

4. The athlete then squats into position without shifting their feet.

Coaching Cues:

• The knee that’s down corresponds to the hand that’s down.

• Form a triangle with your feet and hand.

• The hand should be placed 2 to 2.5 feet in front of the front foot.

• Cue: “Pivot forward” to shift the shoulders over the front hand.

Drill Setup 2: Line Mark Method (No Chalk Needed)

Utilize lines on the gym floor or track:

• Position the back heel on one line and the front toe on the next.

• Drop into the same squat-based setup.

• Emphasize launching forward rather than upward.

Teaching Acceleration with Focus

Coach Missaien stresses the importance of isolating one technique at a time. For instance:

• Arm drive: Use the cue “Split! Split! Split!” and focus solely on that aspect.

• Launch angle: Concentrate on hand and shoulder positioning without critiquing the feet.

• Celebrate small victories—repetition fosters rhythm and builds confidence.

Coach Tip:

Encourage older athletes to mentor younger ones on this drill. It not only strengthens team culture but also reinforces technical consistency.

Acceleration Days

• Incorporate simple drills like cone pickups, short relays, and reaction balls.

• Focus on “long ground contacts” and hip drive, keeping fancy equipment to a minimum.

Wicket Drills for Mechanics

• Set wickets 5 to 6 feet apart to promote vertical push and proper hip height.

• Cue “push vertical to go forward” to prevent overstriding and braking.

Flight & Recovery Position

• Keep heel recovery tight (close to the glutes) and raise the knee to torso height.

• Foot strike under hip—avoid landing in front. _________________________________________________________________________________________________________________

Relays & Handoffs – Ramon Smith

null

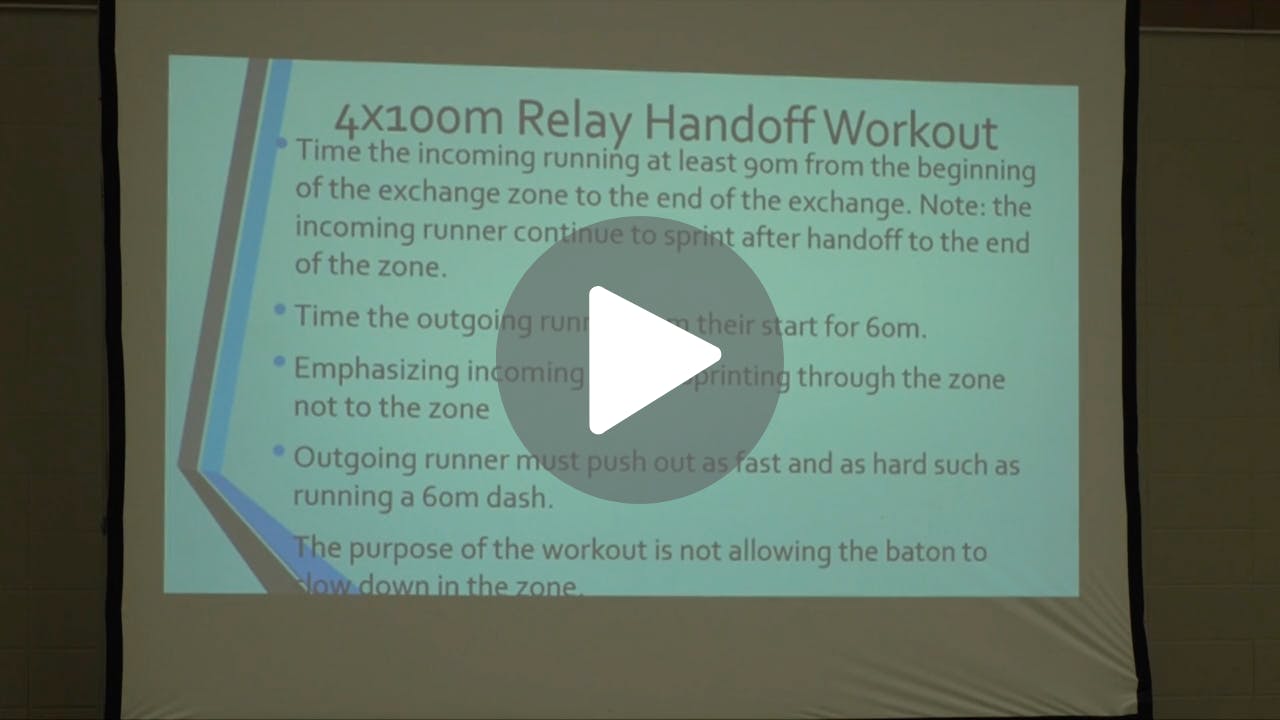
 4×100 Blind-Silent Exchange

For the outgoing runner, keep your fingers together, palm facing out, and thumb pointing down. The incoming runner should push the baton firmly into the target hand. Make sure to mark 15–17 paces from the zone entry for the outgoing runner, and use a heel-toe mark for the incoming runner. When running curves, right-hand sticks are the way to go; for straightaways, stick to the left-hand.

4×400 Exchange

• Start with three strong acceleration strides, then turn your head to receive the baton.

• Don’t forget to practice under lactic fatigue, like at the end of 500m repeats.

_________________________________________________________________________________________________________________

Distance Training

A Full-Season Plan for the 1600/3200

Training distance athletes goes beyond just building endurance; it’s about layering aerobic development, honing speed endurance, and cultivating a mindset geared for championship racing. Whether your runners are focused on the 1600, tackling the 3200, or competing in both, a well-structured progression throughout the year is key to laying the groundwork for success.

Season Overview: Periodization for Distance Runners

null

Weekly Training Template (Typical 7-Day Pre- or Mid-Season Week)

null

Mileage Guidelines by Athlete Type

null

Training Principles for Developing Championship Runners

Start with the Aerobic Base

Take your time with intervals—use December and early January to build your mileage, refine your mechanics, and enhance your running economy.

Begin Race Modeling Early

Once your athletes are fit, it’s time to practice race segments:

- 3×1600m at 3200 pace

- 2×1200m + 2×400m for a 1600 breakdown

- Last-lap simulation workouts

Pace Discipline is Key

Athletes need to understand the feel of race paces—not just focus on the splits. Incorporate threshold work and tempo reps to help them find their rhythm.

Recovery is Part of Training Too

Easy days, rest days, and low-mileage Fridays are essential for keeping athletes healthy and on track.

Confidence: The Hidden Mileage

Confidence isn’t solely built by smashing workouts—it’s also about winning those small moments. Focus on:

- Feeling smooth during reps

- Running negative splits

- Finishing strong even when fatigued

- Controlling a race simulation

Coach Tip: Highlight when things are going well. Celebrate execution, not just the outcomes.

Late-Season Peaking: Fresh Legs, Sharp Minds

By April, your athletes should be in great shape. Now, it’s all about tapering volume and reinforcing rhythm.

Mileage Reduction:

- Cut weekly volume by 25–30% over the last three weeks.

Workout Focus:

- Keep the intensity high, but reduce the number of reps

- Prioritize recovery over volume

- Incorporate confidence-building sessions—faster surfaces, less volume, and a bit more rest

Championship Confidence Workout Example

Mid-Season: 8 × 800m on grass with 2:00 rest → Average 2:35

Peak Phase: 6 × 800m on track with 3:00 rest → Average 2:28

_________________________________________________________________________________________________________________

5. Strength & Conditioning

Building Systems in Large Groups – Adam Vogel

null

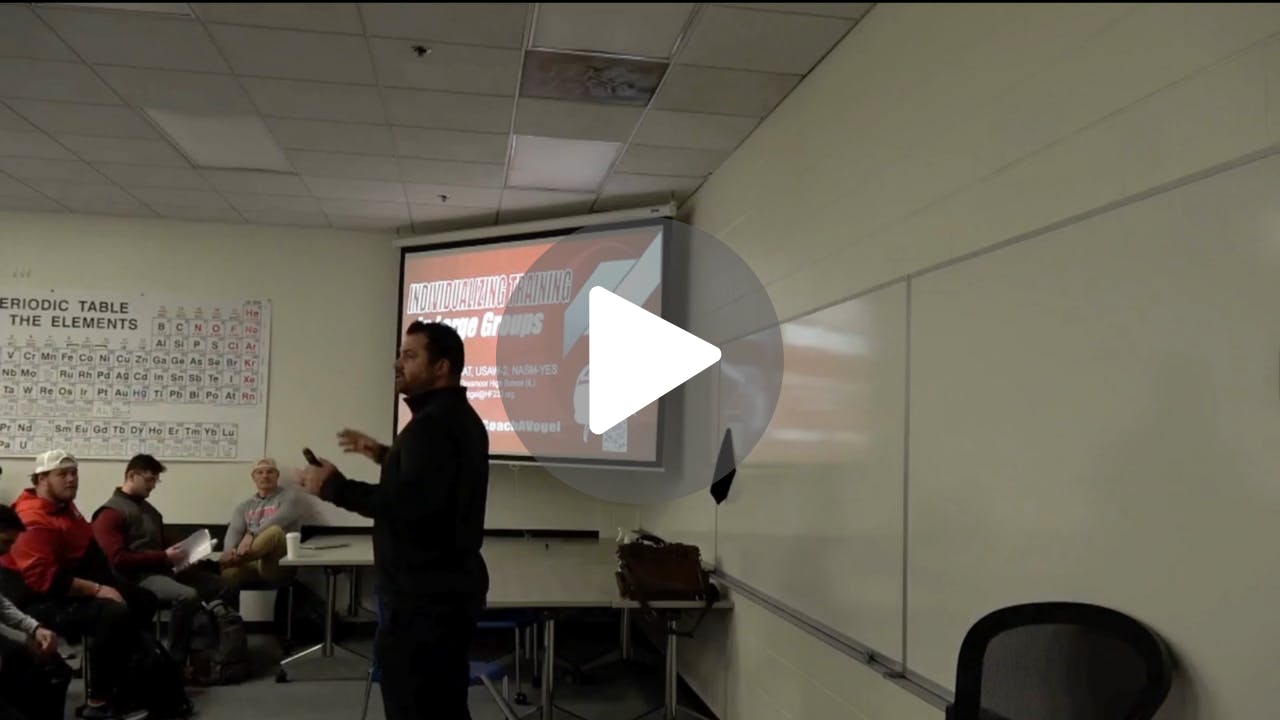
Effective strength training isn’t just about having access to a high-end gym or personal training sessions—it's really about having a solid structure, staying consistent, and being able to adapt to the needs of athletes as they progress. Coaches are sharing their insights on how to tailor training for groups of 40 to over 100 student-athletes by using clear systems, progressions, and fostering leadership development.

Organizing the Chaos: Training Structure by Season

In-Season (Maintenance Focus)

• Shorter lifting sessions (25–35 min)

• Focus on movement quality, bar speed, and athlete readiness

• Swap out volume for mobility, activation, or targeted recovery

Off-Season (Development Focus)

• Full sessions (35–45 min + warm-up)

• Key lifts: squat, hinge, press, pull

• Accessory work tailored to needs: mobility, power, or hypertrophy

Sample Split (4-Day Week):

Day 1: Total body power + upper strength

Day 2: Speed & plyometrics + lower lift

Day 3: Recovery focus or mobility work

Day 4: Full body complex or Olympic lifts + sprint technique

Smart Grouping: Tiered Levels for Athlete Progression

Tier 1 (Freshmen & Beginners)

• Emphasis on form, bodyweight progressions, and learning movement patterns

• Typically follow a unified program

• Focus heavily on mobility, tempo reps, and volume over load

Tier 2 (Sophomores – Developing Athletes)

• Start using barbells, velocity-based cues, and set targets

• May begin to tailor training based on specific sport needs

Tier 3 (Upperclassmen & Advanced Athletes)

• Individualized variations for goal-oriented work (strength, power, lean mass)

• Options for auto-regulation (rep ranges, RPE, jump height)

• Take on leadership roles to mentor younger athletes

Individualizing Within the Group

Correctives & Mobility Swaps

• Got tight hips? Swap out the “B2” accessory lift for some banded hip openers

• Shoulder issues? Try replacing the dumbbell press with landmine variations

Extra Volume (The Right Way)

• Athletes looking for “extra lifts” are guided on how to add volume smartly

• Coaches provide templates that align with recovery needs, not compete with them

• Avoid training fatigue by ensuring the right balance

Use “Athlete Coaches” • Juniors and seniors help run warm-ups, demonstrate lifts, and lead small pods • Encourages team buy-in, accountability, and program ownership

Making It Work Without the Perfect Facility

No rack? No worries! These coaches have found ways to get it done:

 • In hallways (think core work and movement prep)

 • In shared gyms (partner circuits and low-equipment stations)

 • On turf with sleds, bands, and medicine balls

Coach Tip:

Forget about perfection. Focus on consistency. The best programs foster trust, progression, and a strong culture—regardless of how much space you have.

For more training insights, templates, and system design strategies, be sure to check out Adam Vogel’s full clinic ‘Individualizing Large Groups.’

_________________________________________________________________________________________________________________

6. Athlete Development & Autonomy

Empowering Athletes

• Have them keep track of their times, distances, and notes.

• Promote self-reporting (“Did you finish your long run? What was your split?”). Get team captains or senior athletes to create a Strava group for accountability.

Peer Coaching

• Assign captains to specific groups (like distance, sprints, jumps).

• Let a senior thrower or jumper help run drills and do video analysis.

Parent Volunteers

• Bring in knowledgeable parents for event-specific coaching (like vault setup or video feedback).

• Make sure they have basic certification if your district requires it.

_________________________________________________________________________________________________________________

7. Practical Tips for Small-Staff Programs

Limit Team Size

 • Set roster caps and run efficient large-group drills (all athletes across a goal line).

Multitask

 • Pair distance athletes with their runs while working on field event drills.

Senior Leaders

 • Turn your top performers into “player-coaches” under your guidance.

Low-Cost Drills

 • Use cones, sticks, tennis balls, and mini-hurdles—you don’t need fancy gear to build speed.

_________________________________________________________________________________________________________________

8. Bringing It All Together

Plan Your Season: Outline the different phases, peak times, and recovery periods.

Build Culture Daily: Incorporate warm-ups and mental preparation to foster team buy-in.

Drill with Purpose: Every stick drill, hurdle wicket, and relay exchange should have a specific technical goal in mind.

Empower Athletes: Allow them to take charge of their logs, assume leadership roles, and track their progress.

Adapt & Evolve: Analyze video footage, data, and athlete feedback. Make adjustments to wicket spacing, weekly mileage, or timing strategies as needed.

With a solid plan, intentional drills, and a nurturing environment, you’ll witness tangible improvements in sprints, distance, jumps, and throws. Keep in mind that consistency in the basics and open communication are your secret weapons for success.

Good luck out there on the track—let’s make this season the best one yet for your athletes!

NYSS FB Focus on Fun

Dr. Berg On US Sports Radio


Dr. Berg
What Happens if You Eat Mold?
Now streaming on US Sports Radio

Friday, August 8, 2025

US Sports Football: QB Mindset/Preparation- Jake Plummer and Las Vegas Raiders vs. Seattle Seahawks Game Highlights


QB Mindset/Preparation- Jake Plummer

This course gives an overview of: 

1. Jake Plummer's Background and Career

2. Key Qualities your Quarterback Should Have

  • Leadership
  • Preparation
  • Body Language
  • Giving out Positivity and Facing Adversity

3. Overview of Ready List Sports

4. Breakdown of Hank Route

5. Finding Your Cornerstone at QB


The Coach

FootballSummit

Football Coaches Summit

Moving the Chains! We can Help each Other Develop. Coaches Helping Coaches

Jake the Snake was a 10-year NFL veteran and Pro Bowl quarterback with the Arizona Cardinals and Denver Broncos. He was selected by the Arizona Cardinals as  the 42nd pick of the 1997 NFL Draft. He is known for his All-American season and run to the Rose Bowl while at Arizona State and leading the Broncos to the 2005 AFC Championship Game. He was inducted into the College Football Hall of Fame in 2019.  

Book this course...

NYSS Twitter Focus on Fun 

Thursday, August 7, 2025

US Sports Tennis: 8 Pre-Game Exercises to Prime Your Tennis Team for Competition and Shelton Faces Fritz; Zverev Vs Khachanov Toronto 2025


  • By Neil Brown

As with just about any sport, preparing players for physical activity is vital. Not only do these pre-game exercises help a player maximize their performance, but they can also serve as a great way to prevent injuries. This is especially important within the sport of tennis, as it requires a steady amount of endurance. This difficult nature can be summed up in a quote from the great Billie Jean King: “Tennis is a perfect combination of violent action taking place in an atmosphere of total tranquility.”

Exercise #1: Light Jogging

First off, it is important to get your quads and hamstrings loose. This step will include various forms of plyometrics. Some of these may include butt-kicks, carioca steps, wedels, baby bounds, angle slides, and sprints. Many of these exercises are universal and utilized by athletes from different sports. Personally, I have used them in basketball, football, and cross country. They help not only in loosening up but also to maximize explosiveness on the court.

Exercise #2: Stretching

If stretching is not done correctly, injuries can occur quickly. Particularly, the stretching should focus on working out the lower back. Optimum Tennis says it is best to start with touching “your toes straight forward, then spread your legs and try to touch the left toe with your right hand and your right toe with your left hand". I’m sure you have picked up on some stretching exercises as well, so whatever exercises you know of should be successful as long as they account for the lower back in one way or another.

Exercise #3: Light Hitting

After your players are loosened up, let them begin hitting and doing light volleys. Whether it is groundstrokes or volleys, this hitting should prepare the player for competition in terms of reflexes. At first, you should start out closer to the net before moving farther out in increments. At this stage, it is also important to place the focus more so on the technical aspects of the strokes rather than the actual result. Make sure the form is correct.

Exercise #4: Practice Serving

For this particular exercise, you have some leeway in terms of the amount of time spent here. Occasionally, it takes a little longer to get your serve on point. However, for all players, it is important to get at least 5 minutes of warm-up serves in while serving on both sides of the court. Have the players practice serving both near-court and far-court. Possessing this skill in one’s repertoire will make young players more interested in perfecting their serve and keeping the opposition on the ropes.

Exercise #5: Mental Prep

In nearly every sport, it is critical to be mentally focused on the competition ahead. Countless times, I have seen players goofing around in warm-ups and this mindset can be immediately spotted once the game begins. If you’re not mentally prepared, it is easy to see a more talented player fall in defeat. Therefore, at this stage, it is important to keep your players focused on their upcoming matches. During these warm-up exercises above, you can utilize this time to get their head in the game by maintaining focus and taking a professional approach to the warm-up routine.

Exercise #6: Personalized Approach

Each of the five exercises listed above can easily be done in succession as a warm-up routine. However, it’s also your job as a coach to know your individual players and tailor the warm-up to fit their qualities. As a result, I have included this exercise to make unique warm-ups depending on injuries or recent form. iSport states “Always adjust your pre-match routine to fit your personal needs. If you have a bad shoulder, take extra time to stretch it and spend less time focusing on something else. Your warm-up should tailor to your needs, so never feel obligated to a specific routing.” The main thing I can recommend is to work towards your upcoming match. If it’s on a grass court, practice shots that will suit a quicker play. Whereas, if you’re preparing for a clay court match, work on slices that will be more effective in longer rallies.

Exercise #7: Become Students of the Game

To keep your players enthused in the upcoming matches, have them do research on their upcoming opponent. Oftentimes, during the hitting stage of warm-ups, you can do this with your opponent to analyze their game. Are they dominant backhand or forehand players? Does he or she rush the net on a frequent basis or possess a powerful serve? These questions can help you understand what type of player you are going up against and how to adjust your playing style to take advantage of their weaknesses.

Exercise #8: Cool Down After Warm-Up

After completing the exercises above, you should have your players cool down for at least 5 minutes and get some more fluids in them. This will not only allow you to maximize the effectiveness of the warm-up, but it can serve as a relaxer. When I play, this helps me calm down a little bit directly after getting some serves and returns in. It will put the finishing touches on perfecting the mind and body for the match ahead. Possibly the greatest women’s tennis player of all time, Serena Williams said “If you keep playing tennis when somebody is shooting a gun down the street, that’s concentration.” In tennis, the mental aspect can be just as important as the physical nature.

Youth Tennis

Coaching a youth tennis team can be difficult, as you want your players mentally and physically prepared while making it a fun event. The exercises above can be completed to perform both of these tasks at the same time to build team comradery. As a coach, you should use your expertise to adjust your drills and goals to fit your team’s skill set, age, and competition level – all while making sure they are prepared to prevent injuries.

                            NYSS Twitter Be a Role Model

Wednesday, August 6, 2025

The Rock Almighty on US Sports Radio


The Power Of God Compels You!
So Let's Rock!
The Rock Almighty Shaker Of Heaven And Earth.
Now streaming on US Sports Radio!

US Sports Partner Spotlight: Factor


Factor prepares and delivers fresh (never frozen), nutritious meals to your door. Their team of executive chefs and dieticians combine nutrition science and culinary excellence to design dishes that taste amazing and give your body and mind the nutrients needed to perform at their peak.
Get up to $130 off + free shipping on your first box
https://tinyurl.com/Factor2025

US Sports Radio affiliate partner
http://www.USSportsRadio.net

US Sports Lacrosse: Navigating Common Injuries in Women’s Lacrosse and WILDEST Comeback in PLL History?


  • Author Maddie Martin

Lacrosse, often hailed as the fastest sport on two feet, combines speed, skill, and agility to create an exhilarating game, especially in the women’s league. However, this intense physical demand exposes players to significant injury risks, including ankle sprains, knee injuries like ACL tears, and concussions. These injuries can impede performance and potentially have lasting effects on athletes’ health and sports careers. This guide delves into understanding these common injuries, their underlying causes, and emphasizes proactive strategies to minimize their occurrence. By fostering an informed, safety-first approach, we aim to enhance player safety, optimize performance, and extend participation in the sport.

Section 1: Ankle Sprains

Ankle sprains are a prevalent injury in sports, including women’s lacrosse, occurring when the ligaments that support the ankle stretch beyond their limits or tear. These injuries can vary in severity and are categorized into three grades:

Grade I (Mild): Involves stretching or minor tearing of the ligaments with mild tenderness and swelling. Athletes can usually walk with minimal pain.

Grade II (Moderate): Includes partial tearing of the ligament, which causes moderate pain, swelling, and difficulty walking.

Grade III (Severe): Entails a complete tear of the ligament, leading to significant swelling, bruising, and instability, making walking difficult or impossible.

The treatment for ankle sprains typically follows the RICE protocol (Rest, Ice, Compression, Elevation) and may include physical therapy to help restore motion and strength. For severe sprains, immobilization or even surgery may be necessary to repair the torn ligaments.

Section 2: Knee Injuries

Knee injuries are significant concerns in women’s lacrosse due to the high demands of the sport, which often involve rapid pivoting, jumping, and contact. Common knee injuries include:

Anterior Cruciate Ligament (ACL) Injuries: These occur when the knee is twisted forcefully or bent backwards. ACL injuries can lead to considerable instability and often require surgical intervention.

Meniscus Tears: Caused by forceful twisting or rotation of the knee while bearing weight, these injuries can cause pain and mobility issues. Meniscus tears might require arthroscopic surgery depending on the severity.

Patellar Tendinitis (Jumper’s Knee): This overuse injury affects the tendon that connects the kneecap to the shinbone, prevalent in sports requiring frequent jumping.

Treatment strategies for knee injuries typically involve a combination of rest, physical therapy, and, in severe cases, surgery to repair or reconstruct the damaged structures. Preventive measures include proper athletic training t

hat focuses on technique, strength, and flexibility, particularly around the knee area, to support and stabilize the knee joint during high-stress activities.

For more detailed information on knee injuries and their management, the following resource can provide further insight: HHS Knee Pain, Causes and Treatments

Section 3: Concussions

Concussions are a critical concern in women’s lacrosse due to the sport’s high-speed and contact nature. A concussion is a type of traumatic brain injury (TBI) caused by a bump, blow, or jolt to the head or a hit to the body that causes the head and brain to move rapidly back and forth.

Key Aspects of Concussions in Lacrosse:

Causes: Concussions can occur from collisions with other players, being struck by lacrosse sticks or balls, and falls.

Symptoms: They can include headaches, confusion, dizziness, nausea, blurred vision, and sensitivity to light or noise. Some symptoms may appear immediately, while others may develop over hours or days.

Diagnosis and Treatment: Concussions require immediate assessment by healthcare professionals. The main treatment is rest, both physical and cognitive, to allow the brain to heal. Gradual return to play is recommended only after a healthcare provider has cleared the athlete.

Prevention Strategies:

Education and Awareness: Players, coaches, and parents should be educated about the symptoms of concussion and the importance of reporting them.

Protective Equipment: While helmets are optional in women’s lacrosse, choosing to wear a helmet that meets safety standards can help reduce the risk of concussions.

Section 4: How Can Lacrosse Injuries Be Treated?

Treating lacrosse injuries involves several strategies based on the severity and type of injury:

Initial Response: Immediate cessation of activity is crucial for any injury. This helps in assessing the extent of damage and prevents aggravation of the injury.

RICE Protocol: For minor injuries, the RICE (Rest, Ice, Compression, Elevation) method is often recommended to reduce swelling and alleviate pain.

Rehabilitation: More serious injuries might require a more extended period of rest coupled with physical therapy to aid in recovery and prevent future injuries.

Medical and Surgical Intervention: Severe injuries, such as significant ligament tears or fractures, may require surgical interventions to properly heal. Following surgery, structured rehabilitation is essential.

Concussion Care: Head injuries need careful evaluation and monitoring. Athletes should return to play only after being cleared by a healthcare professional, following a gradual return-to-play protocol to ensure they are completely symptom-free.

Each treatment plan is tailored to the specific needs of the injury and the individual, ensuring the best possible recovery and minimization of future injury risks.

Section 5: How Can Lacrosse Injuries Be Prevented?

Preventing injuries in lacrosse is crucial for long-term player health and performance. Here are key strategies to minimize the risk of injuries:

Proper Equipment: Using well-fitted protective gear such as helmets (optional in women’s lacrosse but recommended), mouth guards, gloves, and pads can significantly reduce the risk of injuries.

Conditioning and Strength Training: Implementing a regular strength and conditioning program helps improve overall athleticism, reduces the risk of injuries by strengthening muscles and joints, enhancing muscle balance and joint stability.

Warm-up and Cool Down: Players should perform dynamic warm-ups before games and practices to prepare their bodies for physical stress. Cooling down and stretching after activities can aid in recovery and decrease muscle stiffness.

Education: Educating players about the signs and symptoms of injuries, especially concussions, is crucial. Immediate reporting and treatment of injuries can prevent more serious complications.

Hydration and Nutrition: Maintaining proper hydration and following a balanced diet help prevent muscle cramps and injuries, while also supporting overall health and performance.

Implementing these strategies will help create a safer environment and significantly reduce the risk of sports injuries in lacrosse.

Final Thoughts

As we aim for enhanced safety and effectiveness in lacrosse, it’s crucial for all stakeholders—players, coaches, parents, and sports administrators—to actively participate in injury prevention initiatives. Here’s how each group can make a difference:

Players should adhere to safety protocols, wear appropriate gear, and communicate openly about any discomfort or injuries they experience. Engaging in proper strength and conditioning programs and adhering to warm-up routines are also key to minimizing the risk of injuries.

Coaches must prioritize safety by teaching proper training techniques and creating an environment where athletes feel comfortable reporting injuries. Continuously updating their knowledge on sports safety and injury prevention can significantly benefit the team’s health.

Parents can support by ensuring their children have the necessary protective gear and encouraging adherence to safety practices. Being proactive in managing injuries and staying informed about sports health best practices are vital roles for parents.

Sports Administrators should ensure access to adequate medical facilities and trained healthcare professionals for teams. Promoting education programs about injury prevention and maintaining a safe playing environment are essential responsibilities.

By collaborating, the lacrosse community can enhance player safety, elevate performance, and foster a culture that prioritizes health and safety.

For more information on developing comprehensive sports injury prevention programs and best practices, consider exploring resources from educational and sports medicine organizations like American Orthopaedic Society for Sports Medicine or the National Athletic Trainers’ Association, which offer valuable insights and guidelines.

Free Injury Prevention and Wellness Courses on the ISNation App

If you want to learn more about how to keep yourself or your athletes healthy, check out the free injury prevention courses on the ISNation app.

NYSS Stay In The Game

Tuesday, August 5, 2025

US Sports Basketball: Four Post Moves All Basketball Forwards Should Have In Their Bag and Jordan 🇯🇴 vs India 🇮🇳 1XBET Highlights FIBA Asia Cup 2025


  • By Grant Young

The ability to excel with low post moves can significantly influence a player’s impact on the game. 

This multifaceted skill set is what makes them more effective, versatile, and dangerous on the court. Good post players often rely on a limited range of moves—such as the straightforward hook shot or the basic drop step. 

While these techniques can yield results, they tend to become predictable. Experienced defenders can catch on quickly, effectively anticipating their moves and limiting their scoring opportunities. In contrast, great post players possess an extensive toolkit of moves that keeps defenders perpetually guessing. They can fluidly transition between an array of techniques—like up-and-unders, spin moves, fadeaways, and crafty foot fakes. This unpredictability doesn’t just create scoring opportunities; it forces defenders to react swiftly, often leading to mistakes and fouls. 

A diverse post repertoire empowers players to tailor their strategy based on the specific matchup or court positioning. A physically dominant player might lean toward powerful finishes at the rim, while a more agile player could opt for finesse moves that create space for crisp jump shots. This adaptability not only amplifies their scoring ability but also enhances the overall effectiveness of their team’s offense. 

By consistently varying their post play, they can exploit mismatches, capitalizing on smaller or less skilled defenders. In essence, the divide between good and great post players lies in their ability to draw from a rich arsenal of post moves. This variety fosters unpredictability, enhances scoring potential, and promotes effective teamwork. 

Having a comprehensive skill set of low post moves can transform a player from being merely good into an extraordinary force in the post game.

When it comes to knowing the right post moves to teach young players, few can be trusted more than Luka Bassin. 

Luka Bassin is a Slovenian basketball coach who worked at all levels of European basketball. He served as video coordinator, advanced scout, scout, assistant coach, player development coach and head coach in the best Slovenian team Olimpija, as well in youth and senior national teams of Slovenia.

Coach Bassin’s ‘POST UP Encyclopedia (LOW POST strategies)’ details a plethora of post moves that he has seen used to great success in professional basketball. We’ve pulled four of his favorites to include below for your use. 

Post Pin (Over The Top)

One of Coach Bassin’s low post moves is called the post pin, which occurs when a defender (ideally a smaller defender who is mismatched down low) tries to “front” the post player (playing in front of them in order to deter a pass). 

In this situation, the post player will want to set their front arm against the defender’s back and create as much space between them and the rim as possible. Once they’re able to do so, the guard or whoever has the ball will want to lob the ball in between the post player and the rim. 

For this to work, the post player has to use their legs and superior size to create space in the paint while keeping their arm up in the air to indicate that they’re open. Once the pass is received, they need to get their shot up without bringing the ball back downward, as that can allow the defender an opportunity to take the ball away. 

Baseline Spin

null

Another one of Coach Bassin’s favorite post moves is the baseline spin, which becomes an option once a post player is slightly out of the paint along the baseline with a defender in proper position behind them.

Once they receive the pass, the post player will want to lean backward against their defender. This is a crucial step for this move’s success because it will inform the post player where their defender is trying to guard them depending on which side they’re positioned. 

If the post player is positioned away from the baseline (which is usually the case), this creates an opportunity for the post player to spin around using their inside pivot foot toward the baseline, which will open up a path for them to either drive to the basket or shoot a jump shot from their current position, depending on their skill set.


Step Through 

Another important move that a post player can add to their arsenal is what Coach Bassin calls the step-through move. 

This move starts when the big receives the ball on either block. From there, they’ll take a moment to gauge when their opponent is trying to contain them defensively. Once that verdict is reached, the player will either drive to the middle or to the baseline (depending on their defender) go up for a shot, pump fake, and then use their pivot foot to alter to a new position before taking their actual shot. 

This shift in rhythm will throw the defender off and likely create a wide-open shot close to the basket. 

Face Up Drive Middle

null

The fourth and final post move from Coach Bassin we’re discussing is what he calls the face up drive middle. 

This move is perhaps the most simple. All the post player is going to do is get the pass, face up to their defender, and drive straight through their chest. Since there isn’t much momentum, it’s unlikely that the defender will try to take a charge. But it should knock them off their balance enough to open up space.

NYSS Find Their Strengths 

Monday, August 4, 2025

US Sports Football: Win Downfield - Attacking Different Areas Deep with 3rd Level RPO and Los Angeles Chargers vs. Detroit Lions Game Highlights


  • By Coach Grabowski

For teams that are RPO-heavy in their attack, the defense will start to take away conflict by bringing a safety down into the boxbe.com/courses/football/defensive-backs">safety down into the box either pre-snap by alignment or by rotation in buzzing a safety down into the box.

With this move, they effectively equate numbers in the run, and the underneath passing windows are typically left open by a 2nd level player whose run-fits are now taken away.

This creates the necessity of having vertical answers.  An offense can drop back and use seam reads or choice routes, but the objective of any RPO is to run the ball while having a protection answer.

Of course, the RPO can remain the call by simply shifting to a 3rd Level RPO. Most of these are designed with some sort of underneath throws still available with quick routes or key screens.  When the offense is successful with these, then the defense needs to decide if it really wants to bring that extra defender down.

Today, we will take a look at three 3rd Level RPO with the Glance, Bender, and Slot Fade and how each attacks a void in the defense.

Glance

If the backside safety comes down, then Glance is a favorite for many programs.  These typically are run as a 5-step break. 

Glance can be run to the field as well. At Alabama, they call it “pop.” The idea is to attack space as Alabama WR Coach Holmon Wiggins points out in this video:

null

Glance is fine to the field as well, but you have to be wary of the backside safety.  Noel Mazzone has his receivers flatten it out to what he calls a grass glance.  The purpose is to not bring the Glance into the safety. He explains it in this video:

Bender

Another option is to use a Bender route allowing the receiver to bend into the void rather than giving a distinct break.  This type of route comes into play versus different rotations but it allows the offense to attack a void in the middle of the defense with an easy throw.  Former Averett OC Kirkland Brown explains it off of a gap scheme in this video:

Slot Fade

Glance and Bender bring the receivers into the middle of the field, so safeties are always a danger, but the slot fade attacks a different void of the defense and can be protected with back shoulder throws as well.

Former SDSU OC Jeff Hecklinski explains the Slot Fade RPO here:

Defenses are getting better and better in how they defend RPO.  Having a mechanism to attack their aggressiveness can provide answers and explosive plays.

Planning for some 3rd Level RPO answers can be an effective way to get the chalk back for the offense.

NYSS Every Kid In the Game